검색결과 리스트
안드로이드에 해당되는 글 88건
- 2023.09.10 Android에서 Glib 사용하기(NDK)
- 2022.02.15 안드로이드 기기 간에 Wifi Socket 채팅방 만들기(Kotlin)
- 2019.12.04 안드로이드 기기 간에 Wifi Socket 통신하기(Kotlin) 2
- 2016.11.01 Cannot call LoginFragment with a null calling package. This can occur if the launchMode of the caller is singleInstance.
- 2016.08.09 안드로이드 6.0에서 SecurityException 처리방법(Call requires permission which may be rejected by user....)
- 2016.03.03 안드로이드 프레임워크 프로그래밍(28) [System Service의 proxy와 native의 Interface 상속 구조]
- 2015.12.31 안드로이드 프레임워크 프로그래밍(27) [Fedora에서 AOSP 안드로이드 운영체제 컴파일하기]
- 2015.12.21 Fedora에서 Android Studio가 동작되지 않을 때[Unable to run mksdcard SDK tool]
- 2015.11.22 Windows 환경에서 fastboot를 통해 Android 이미지 포팅(Fastboot in Windows 7) 3
- 2015.11.06 Android Studio로 improt 한 후 컴파일 타겟 변경하기(failed to find target with hash string ...)
- 2015.10.29 안드로이드 - Java 서버간 Object 객체 소켓 프로그래밍 8
- 2015.10.27 안드로이드 프레임워크 프로그래밍(26) [System Service에서 Activity 함수 호출하기]
글
Android에서 Glib 사용하기(NDK)
최근 안드로이드 태블릿을 사용하게 되면서 일상에 많은 변화를 체험하고 있습니다. 휴대폰에 비해 압도적으로 큰 화면 덕분에 장거리 이동시 유튜브 영상 시청을 하거나, 블루투스 키보드를 연결하여 노트북 대용으로 업무를 수행할 수 있고, 통신사 USIM칩을 삽입하면 장소에 구애받지 않고 어디서든 인터넷을 사용할 수 있어 Wi-Fi를 찾아다니며 인터넷 연결을 해야 했던 노트북에 비해 상당한 편리함을 느끼고 있습니다.
최근에 영상 활용 프로그램을 개발하고 있어 노트북을 자주 들고 다니는데, 이참에 안드로이드 태블릿으로 업무를 수행하면 좀 더 편하게 다닐 수 있을 것이라 생각되어 안드로이드 앱으로 내가 필요한 기능을 구현해보기로 하였습니다.
처음엔 안드로이드도 Linux 기반이어서 Linux PC에서 개발하였던 프로그램을 쉽게 설계할 수 있을 것이라 생각하고 덤볐는데 예상치 못한 난관을 (예상대로) 겪고 있습니다. NDK를 처음 사용하다보니 생각보다 공부할게 많고...
언제나 그랬듯이 좌충우돌 하며 NDK에 대해 공부했던 내용들을 정리해보고자 합니다. Linux 환경에서 자주 사용되는 Glib를 Android NDK 환경에서 사용할 수 있도록 라이브러리를 컴파일 하는 방법에 대해 살펴보도록 하겠습니다.
※개발환경
운영체제: Ubuntu22.04(WSL2)
Android버전: API21
NDK버전: r25c
1. Android NDK 설치
안드로이드 공식 사이트에서 NDK를 다운로드 받습니다. 다음으로 폴더 압축을 푼 다음 .bashrc에 NDK폴더 경로를 PATH 환경변수에 추가해줍니다.
NDK 다운로드 | Android NDK | Android Developers
NDK 다운로드 컬렉션을 사용해 정리하기 내 환경설정을 기준으로 콘텐츠를 저장하고 분류하세요. 개발 플랫폼에 맞는 NDK 패키지를 선택합니다. NDK 최신 버전의 변경사항 및 이전 버전에 관한 정
developer.android.com
export PATH=NDK경로:$PATH
2. 개발환경 구축
Android NDK 개발환경 구축을 위해 필요한 패키지들을 설치합니다.
$ sudo apt install meson ninja openjdk-19-jdk
3. Glib 사용을 위한 라이브러리 다운로드
Glib 라이브러리는 아래 사이트에서 다운로드 합니다. (glib-2.77.2 기준)
https://gitlab.gnome.org/GNOME/glib/-/releases/2.77.2
Glib 라이브러리를 사용하기 위해서는 아래의 패키지들이 먼저 준비되어 있어야 합니다.
Libiconv
http://ftp.gnu.org/pub/gnu/libiconv/libiconv-1.17.tar.gz
Gettext
http://ftp.gnu.org/pub/gnu/gettext/gettext-0.21.tar.gz
4. Configure 환경 구성 및 컴파일
다운로드한 라이브러리를 Android 기기에서 동작할 수 있도록 컴파일 하기 위해 Configure 환경에 맞게 설정을 해주어야 합니다. 아래의 스크립트를 자신의 환경에 맞추어 작성합니다.
# env.sh

#컴파일된 패키지가 설치될 경로
export PREFIX=/home/user/Android
#라이브러리 경로
export LIBDIR=$PREFIX/lib
#include 경로
export INCLUDEDIR=$PREFIX/include
#pkg-config 경로
export PKG_CONFIG_PATH=$PREFIX/lib/pkgconfig
#Build가 진행되는 HOST기기 정보
export BUILD_SYS=x86_64-linux-gnu
#적용하고자 하는 최소 안드로이드 버전. 21부터 aarch64(ARMv8) 지원
export ANDROID_API=21
#NDK 내부에 위치한 sysroot 경로
export SYSROOT=NDK설치경로/toolchains/llvm/prebuilt/linux-x86_64/sysroot/
export TOOLCHAIN=NDK설치경로/toolchains/llvm/prebuilt/linux-x86_64/

#안드로이드 기기의 아키텍처
export TARGET=aarch64-linux-android     #ARMv8
#export TARGET=armv7a-linux-androideabi #ARMv7
#export TARGET=i686-linux-android       #32비트
#export TARGET=x86_64-linux-android     #64비트

export AR=$TOOLCHAIN/bin/llvm-ar
export CC=$TOOLCHAIN/bin/$TARGET$ANDROID_API-clang
export AS=$TOOLCHAIN/bin/llvm-as
export CXX=$TOOLCHAIN/bin/$TARGET$ANDROID_API-clang++
export LD=$TOOLCHAIN/bin/ld
export RANLIB=$TOOLCHAIN/bin/llvm-ranlib
export STRIP=$TOOLCHAIN/bin/llvm-strip

export LD_LIBRARY_PATH=$LIBDIR
export CFLAGS="-fPIC -I$INCLUDEDIR"
export CXXFLAGS="-fPIC -I$INCLUDEDIR"
export LDFLAGS="-fPIC -pie -L$LD_LIBRARY_PATH"
export LIBS="-L$LD_LIBRARY_PATH"

export PKG_CONFIG=/usr/bin/pkg-config
export PKG_CONFIG_PATH=$LIBDIR/pkgconfig
환경 구성 스크립트 작성이 완료되었다면 이제 본격적으로 라이브러리를 크로스컴파일 해보겠습니다. 먼저 libiconv 라이브러리를 크로스컴파일합니다.
. ./env.sh

cd libiconv-1.17/
./configure --host=$TARGET \
	--prefix=$PREFIX \
	--enable-static

make -j8
make install
다음으로 Gettext 라이브러리를 크로스컴파일 합니다.
. ./env.sh

cd gettext-0.21/
./configure --host=$TARGET \
	--prefix=$PREFIX \
	--enable-static

make -j8
make install
5. Glib 크로스컴파일을 위한 meson 환경 구성 및 컴파일
Glib을 사용하기 위해 필요한 라이브러리 설치가 완료되었다면 Glib를 크로스컴파일 합니다. Glib는 meson 컴파일 환경을 제공하고 있어 아래와 같이 cross_file.txt 파일을 작성하여 적용하실 수 있습니다.
[constants]
arch = 'aarch64-linux-android'
android_ndk = 'NDK 경로/toolchains/llvm/prebuilt/linux-x86_64/bin/'
outdir = '라이브러리 설치 경로/'

[binaries]
ar = 'NDK 경로/toolchains/llvm/prebuilt/linux-x86_64/bin/llvm-ar'
c = 'NDK 경로/toolchains/llvm/prebuilt/linux-x86_64/bin/aarch64-linux-android21-clang'
as = 'NDK 경로/toolchains/llvm/prebuilt/linux-x86_64/bin/llvm-ar'
cpp = 'NDK 경로/toolchains/llvm/prebuilt/linux-x86_64/bin/aarch64-linux-android21-clang++'
ranlib = 'NDK 경로/toolchains/llvm/prebuilt/linux-x86_64/bin/llvm-ranlib'
strip = 'NDK 경로/toolchains/llvm/prebuilt/linux-x86_64/bin/llvm-strip'
ld = 'NDK 경로/toolchains/llvm/prebuilt/linux-x86_64/bin/ld'
objcopy = 'NDK 경로/toolchains/llvm/prebuilt/linux-x86_64/bin/llvm-objcopy'
pkgconfig = '/usr/bin/pkg-config'

[properties]
sys_root = 'NDK 경로/toolchains/llvm/prebuilt/linux-x86_64/sysroot'
pkg_config_lib_dir = '라이브러리 설치 경로/lib/pkgconfig'

[host_machine]
system = 'android'
cpu_family = 'aarch64'
cpu = 'aarch64'
endian = 'little'

[built-in options]
prefix = '라이브러리 설치 경로/'
c_args = ['-fPIC','-I/라이브러리 설치 경로/include']
cpp_args = ['-fPIC','-I/라이브러리 설치 경로/include']
c_link_args = ['-fPIE','-L/안드로이드 설치 경로/lib']

pkg_config_path = '/안드로이드 설치 경로/lib/pkgconfig'

default_library = 'static'
cross_file.txt 파일이 준비되었다면 컴파일 및 설치를 진행합니다.
# . ./env.sh
cd glib-2.77.2
meson build --cross-file cross_file.txt
cd build
ninja
ninja install
6. 안드로이드 프로젝트에 적용하기
라이브러리 설치 경로에 Glib 라이브러리 파일이 만들어진 것을 확인하실 수 있습니다. 만들어진 Glib 라이브러리 파일을 자신의 NDK 프로젝트에 삽입하시면 안드로이드 앱으로 Glib를 실행할 수 있습니다.
참고자료
GitHub - edaplayer/android-ndk-harfbuzz
Contribute to edaplayer/android-ndk-harfbuzz development by creating an account on GitHub.
github.com
Cross-compile GLib for Android — MobileInsight Official Website
First get the source code for gettext 0.18.3 $ wget http://ftp.gnu.org/pub/gnu/gettext/gettext-0.18.3.tar.gz $ tar zxvf gettext-0.18.3.tar.gz To compile gettext-0.18.3, a patch must be applied. In gettext-tools/src/msginit.c, change line 1088 from fullname
mobileinsight.net
Cross-compile GLib for Android · Nosce Te Ipsum
Cross-compile GLib for Android 17 Jul 2016 Prepare cross-compile environment Update: You may now use Android NDK r15c and beyond. I have made an all-in-one script repo at my GitHub repo First, you need to have Android NDK r10e installed, which can be downl
zwyuan.github.io
설정
트랙백
댓글
글
안드로이드 기기 간에 Wifi Socket 채팅방 만들기(Kotlin)
안드로이드에 Kotlin이 사용되면서 기존에 Java로 작성하였던 프로젝트를 진행하였던 적이 있었습니다. 그 당시 낮선 언어였던 Kotlin을 처음 공부하면서 소스코드를 다시 만들어봤었는데 그게 벌써 3년전의 일이 되었군요. 그 사이 안드로이드도 12버전(API 32, Snow cake)이 나온 상황입니다. 그런데 신기하게도 통신방식인 TCP는 프로그래밍 언어의 정의 방법의 차이일 뿐 동작 원리는 똑같기에 Kotlin으로 소스코드를 고쳐씀에 다행히 큰 불편함은 없었습니다.
이번 포스팅에서는 기존에 작성하였던 서버-클라이언트 1:1 통신 환경을 확장하여 여러 대의 기기가 서버에 동시 접속하여 대화하는 채팅 시스템을 안드로이드 Kotlin으로 구현해 보았습니다.
혹시 이전에 제가 작업하였던 서버-클라이언트 1:1 통신 방법에 대한 내용이 궁금하신 분은 아래의 링크를 참조하시기 바랍니다.
안드로이드 기기 간에 Wifi Socket 통신하기(Kotlin)
오랜만에 안드로이드를 다루어보는 기회가 생겼는데 생각보다 많은 변화가 있었습니다. 특히 올해부터는 구글에서 새로 만든 프로그래밍 언어인 Kotlin이 도입되면서 Java 위주로 설계된 안드로
elecs.tistory.com
동작원리
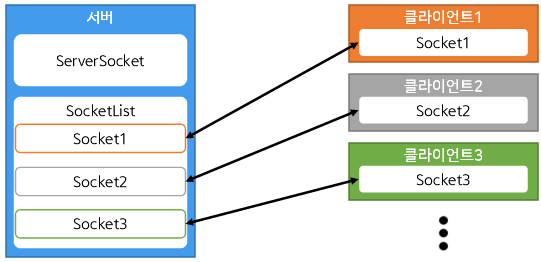
이 프로젝트에서는 1개의 서버에 다수의 클라이언트가 접속할 수 있는 환경으로 아래와 같이 구성하였습니다.
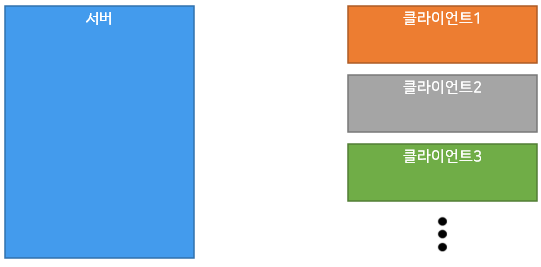
먼저 Server 역할을 하는 기기에서 서버 Port를 엽니다.
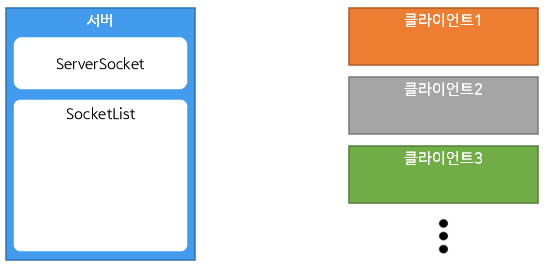
포트가 열린 서버에 클라이언트가 접속을 시도하면 서버는 ServerSocket가 클라이언트의 접속을 받습니다.
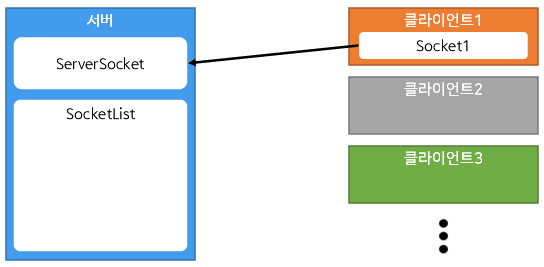
클라이언트의 접속을 받아들인 ServerSocket는 해당 클라이언트와 통신을 수행할 별개의 Socket을 생성해 이를 SocketList에 추가합니다.
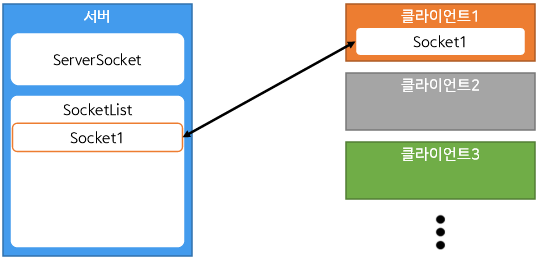
이후 다른 클라이언트가 서버에 접속하면 위와 같은 방식으로 해당 클라이언트와 통신을 수행하는 Socket을 생성하여 이를 SocketList에 추가합니다.
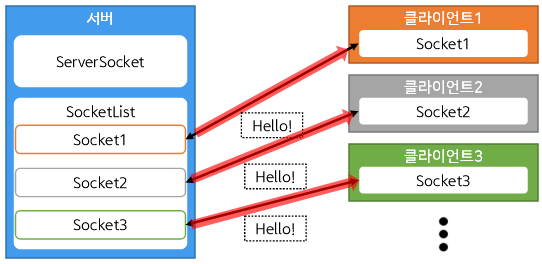
다수의 클라이언트가 연결된 환경에서 클라이언트 한 곳에서 메시지를 서버에 보내면
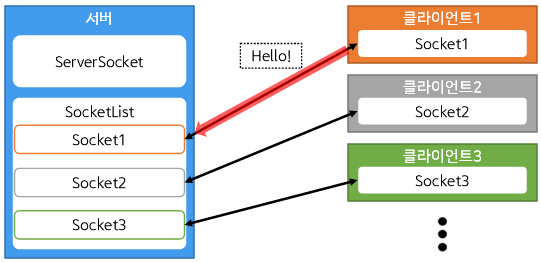
서버에서는 SocketList에 있는 모든 Socket에 메시지를 Broadcast합니다.
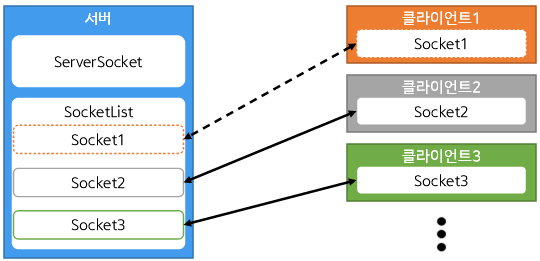
만약 클라이언트에서 접속을 종료하게 될 경우 서버는 접속이 종료된 소켓을 SocketList에서 삭제함으로서 채팅을 종료합니다.
※ 이 프로젝트는 Lolipop 이상의 버전에서 테스트 하였습니다.
AndroidManifest.xml
|
1
2
3
4
5
6
7
8
9
10
11
12
13
14
15
16
17
18
19
20
21
22
23
24
25
26
27
|
<?xml version="1.0" encoding="utf-8"?>
<manifest xmlns:android="http://schemas.android.com/apk/res/android"
package="com.example.androidchatroom">
<uses-permission android:name="android.permission.INTERNET"/>
<uses-permission android:name="android.permission.ACCESS_NETWORK_STATE"/>
<uses-permission android:name="android.permission.ACCESS_WIFI_STATE"/>
<application
android:allowBackup="true"
android:icon="@mipmap/ic_launcher"
android:label="@string/app_name"
android:roundIcon="@mipmap/ic_launcher_round"
android:supportsRtl="true"
android:theme="@style/Theme.AndroidChatRoom">
<activity
android:name=".MainActivity"
android:exported="true">
<intent-filter>
<action android:name="android.intent.action.MAIN" />
<category android:name="android.intent.category.LAUNCHER" />
</intent-filter>
</activity>
</application>
</manifest>
|
cs |
strings.xml
|
1
2
3
4
5
6
7
8
9
10
11
12
13
14
15
16
17
18
19
|
<resources>
<string name="app_name">AndroidChatRoom</string>
<string name="hello_world">Hello world!</string>
<string name="action_settings">Settings</string>
<string name="ip">SERVER IP</string>
<string name="port">PORT</string>
<string name="name">NAME</string>
<string name="msg">MESSAGE</string>
<string name="hint_port">PORT NUMBER</string>
<string name="hint_ip">192.168.0.1</string>
<string name="hint_name">USER</string>
<string name="hint_msg">Hello, world!</string>
<string name="button1">Connect</string>
<string name="button2">Disconnect</string>
<string name="button3">Set Server</string>
<string name="button4">Close Server</string>
<string name="button5">Clear All Text</string>
<string name="button6">Send Message</string>
</resources>
|
cs |
Activity_main.xml
|
1
2
3
4
5
6
7
8
9
10
11
12
13
14
15
16
17
18
19
20
21
22
23
24
25
26
27
28
29
30
31
32
33
34
35
36
37
38
39
40
41
42
43
44
45
46
47
48
49
50
51
52
53
54
55
56
57
58
59
60
61
62
63
64
65
66
67
68
69
70
71
72
73
74
75
76
77
78
79
80
81
82
83
84
85
86
87
88
89
90
91
92
93
94
95
96
97
98
99
100
101
102
103
104
105
106
107
108
109
110
111
112
113
114
115
116
117
118
119
120
121
122
123
124
125
126
127
128
129
130
131
132
133
134
135
136
137
138
139
140
141
142
143
144
145
146
147
148
149
150
151
152
153
154
155
156
157
158
159
160
161
162
163
164
165
166
167
168
169
170
171
172
173
174
175
176
177
178
179
180
181
182
183
184
185
186
187
188
189
|
<?xml version="1.0" encoding="utf-8"?>
<androidx.constraintlayout.widget.ConstraintLayout xmlns:android="http://schemas.android.com/apk/res/android"
xmlns:app="http://schemas.android.com/apk/res-auto"
xmlns:tools="http://schemas.android.com/tools"
android:layout_width="match_parent"
android:layout_height="match_parent"
tools:context=".MainActivity">
<LinearLayout
android:layout_width="match_parent"
android:layout_height="match_parent"
android:orientation="vertical">
<LinearLayout
android:layout_width="match_parent"
android:layout_height="wrap_content"
android:orientation="horizontal">
<TextView
android:id="@+id/textView"
android:layout_width="70dp"
android:layout_height="wrap_content"
android:text="@string/ip" />
<EditText
android:id="@+id/et_ip"
android:layout_width="match_parent"
android:layout_height="48dp"
android:ems="10"
android:hint="@string/hint_ip"
android:importantForAccessibility="no"
tools:ignore="Autofill"
android:inputType="textUri"
android:singleLine="true" />
</LinearLayout>
<LinearLayout
android:layout_width="match_parent"
android:layout_height="wrap_content"
android:orientation="horizontal">
<TextView
android:id="@+id/textView2"
android:layout_width="70dp"
android:layout_height="wrap_content"
android:text="@string/port" />
<EditText
android:id="@+id/et_port"
android:layout_width="match_parent"
android:layout_height="48dp"
android:ems="10"
android:hint="@string/hint_port"
android:importantForAccessibility="no"
tools:ignore="Autofill"
android:inputType="number"
android:singleLine="true" />
</LinearLayout>
<LinearLayout
android:layout_width="match_parent"
android:layout_height="wrap_content"
android:orientation="horizontal">
<TextView
android:id="@+id/textView3"
android:layout_width="70dp"
android:layout_height="wrap_content"
android:text="@string/name" />
<EditText
android:id="@+id/et_name"
android:layout_width="match_parent"
android:layout_height="48dp"
android:ems="10"
android:hint="@string/hint_name"
android:importantForAccessibility="no"
tools:ignore="Autofill"
android:singleLine="true" />
</LinearLayout>
<LinearLayout
android:layout_width="match_parent"
android:layout_height="wrap_content"
android:orientation="horizontal">
<TextView
android:id="@+id/textView4"
android:layout_width="70dp"
android:layout_height="wrap_content"
android:text="@string/msg" />
<EditText
android:id="@+id/et_msg"
android:layout_width="match_parent"
android:layout_height="48dp"
android:ems="10"
android:hint="@string/hello_world"
android:importantForAccessibility="no"
tools:ignore="Autofill"
android:inputType="textPersonName" />
</LinearLayout>
<LinearLayout
android:layout_width="match_parent"
android:layout_height="wrap_content"
android:orientation="horizontal">
<Button
android:id="@+id/button_connect"
style="@style/Widget.AppCompat.Button.Small"
android:layout_width="0dp"
android:layout_height="wrap_content"
android:layout_weight="1"
android:minWidth="0dip"
android:text="@string/button1"
android:textSize="12sp" />
<Button
android:id="@+id/button_disconnect"
style="@style/Widget.AppCompat.Button.Small"
android:layout_width="0dp"
android:layout_height="wrap_content"
android:layout_weight="1"
android:minWidth="0dip"
android:text="@string/button2"
android:textSize="12sp" />
<Button
android:id="@+id/button_msg"
style="@style/Widget.AppCompat.Button.Small"
android:layout_width="0dp"
android:layout_height="wrap_content"
android:layout_weight="1"
android:minWidth="0dip"
android:text="@string/button6"
android:textSize="12sp" />
</LinearLayout>
<LinearLayout
android:layout_width="match_parent"
android:layout_height="wrap_content"
android:orientation="horizontal">
<Button
android:id="@+id/button_setserver"
style="@style/Widget.AppCompat.Button.Small"
android:layout_width="0dp"
android:layout_height="wrap_content"
android:layout_weight="1"
android:text="@string/button3"
android:textSize="12sp" />
<Button
android:id="@+id/button_closeserver"
style="@style/Widget.AppCompat.Button.Small"
android:layout_width="0dp"
android:layout_height="wrap_content"
android:layout_weight="1"
android:text="@string/button4"
android:textSize="12sp" />
<Button
android:id="@+id/button_clear"
style="@style/Widget.AppCompat.Button.Small"
android:layout_width="0dp"
android:layout_height="wrap_content"
android:layout_weight="1"
android:text="@string/button5"
android:textSize="12sp" />
</LinearLayout>
<ScrollView
android:id="@+id/sv"
android:layout_width="match_parent"
android:layout_height="match_parent">
<TextView
android:id="@+id/text_status"
android:layout_width="match_parent"
android:layout_height="wrap_content"
android:textSize="18sp"
/>
</ScrollView>
</LinearLayout>
</androidx.constraintlayout.widget.ConstraintLayout>
|
cs |
Activity_main.xml을 MainActivity.kt에서 바로 불러오기 위해서는 "import kotlinx.android.synthetic.main.activity_main.*"
을 통해 불러올 수 있습니다. 이 기능을 수행하기 위해 Gradle에 아래와 같이 'id kotlin-android-extentions'를 추가하여야 합니다.
먼저 Gradle Scripts→build.gradle (Module: *.app)을 선택합니다.
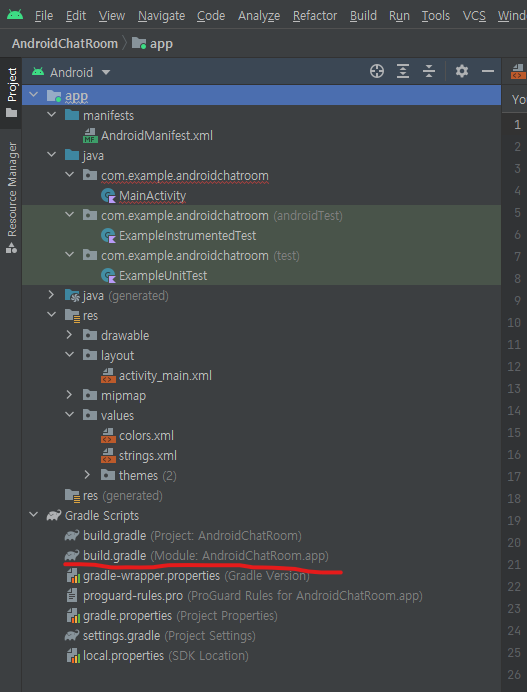
플러그인에 'id kotlin-android-extension' 추가 후 'Sync Now'를 클릭하세요.
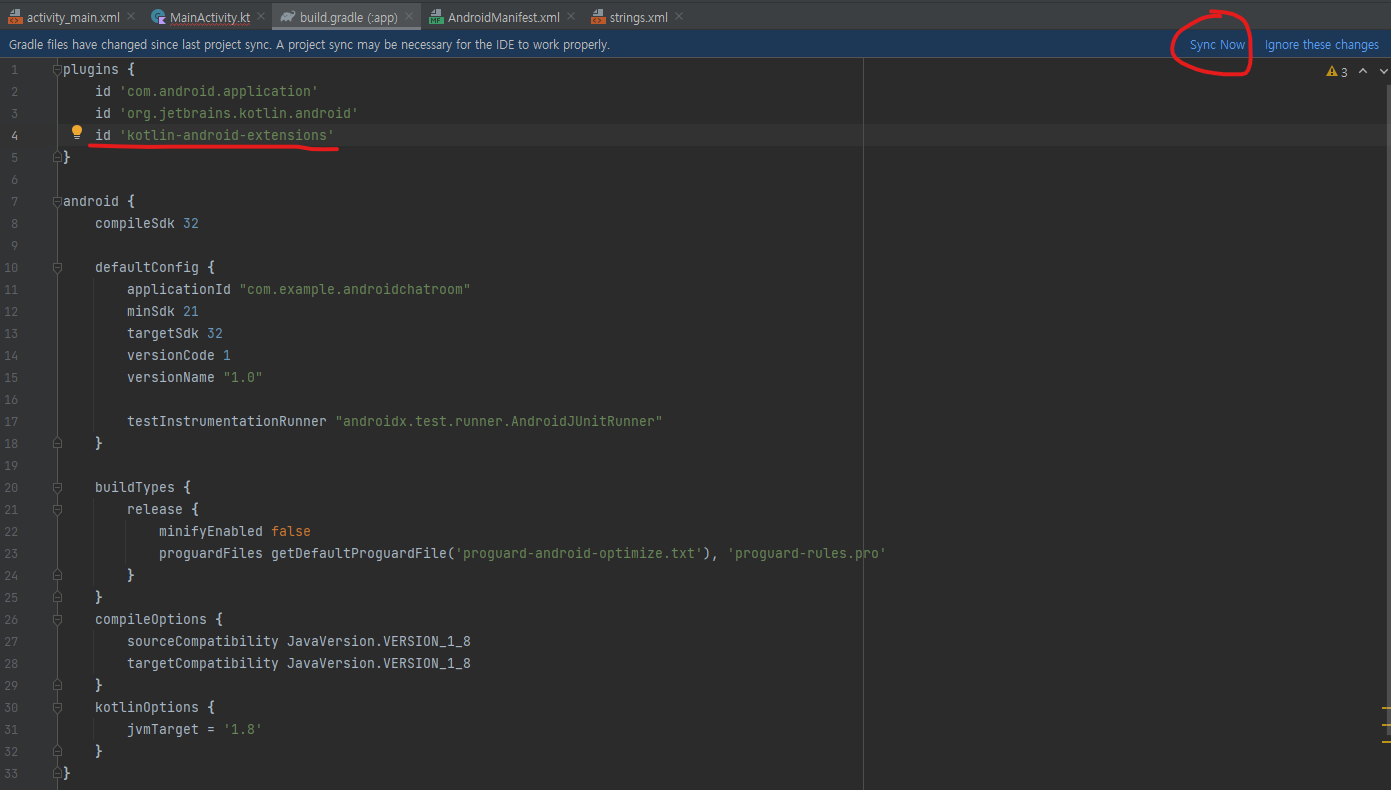
위 과정을 수행하면 MainActivity.kt에서 id로 설정한 view를 바로 불러올 수 있습니다.
MainActivity.kt
|
1
2
3
4
5
6
7
8
9
10
11
12
13
14
15
16
17
18
19
20
21
22
23
24
25
26
27
28
29
30
31
32
33
34
35
36
37
38
39
40
41
42
43
44
45
46
47
48
49
50
51
52
53
54
55
56
57
58
59
60
61
62
63
64
65
66
67
68
69
70
71
72
73
74
75
76
77
78
79
80
81
82
83
84
85
86
87
88
89
90
91
92
93
94
95
96
97
98
99
100
101
102
103
104
105
106
107
108
109
110
111
112
113
114
115
116
117
118
119
120
121
122
123
124
125
126
127
128
129
130
131
132
133
134
135
136
137
138
139
140
141
142
143
144
145
146
147
148
149
150
151
152
153
154
155
156
157
158
159
160
161
162
163
164
165
166
167
168
169
170
171
172
173
174
175
176
177
178
179
180
181
182
183
184
185
186
187
188
189
190
191
192
193
194
195
196
197
198
199
200
201
202
203
204
205
206
207
208
209
210
211
212
213
214
215
216
217
218
219
220
221
222
223
224
225
226
227
228
229
230
231
232
233
234
235
236
237
238
239
240
241
242
243
244
245
246
247
248
249
250
251
252
253
254
255
256
257
258
259
260
261
262
263
264
265
266
267
268
269
270
271
272
273
274
275
276
277
278
279
280
281
282
283
284
285
286
287
288
289
290
291
292
293
294
295
296
297
298
299
300
301
302
303
304
305
306
307
308
309
310
311
312
313
314
315
316
317
318
319
320
321
322
323
324
325
326
327
328
329
330
331
332
333
334
335
336
337
338
339
340
341
342
343
344
345
346
347
348
349
350
351
352
353
354
355
356
357
358
359
360
361
362
363
364
365
366
367
368
369
370
371
372
373
374
375
376
377
378
379
380
381
382
383
384
385
386
387
388
389
390
391
392
393
394
395
396
397
398
399
400
401
402
403
404
405
406
407
408
409
410
411
412
413
414
415
416
417
418
419
420
421
422
423
424
425
426
427
428
429
430
431
432
433
434
435
436
437
438
439
440
441
442
443
444
445
446
447
448
449
450
451
452
453
454
455
456
457
458
459
460
461
462
463
464
465
466
467
468
469
470
471
472
473
474
475
476
477
478
|
package com.example.androidchatroom
import androidx.appcompat.app.AppCompatActivity
import android.content.Context
import android.net.ConnectivityManager
import android.os.Bundle
import android.os.Handler
import android.os.Looper
import android.os.Message
import android.widget.Toast
import kotlinx.android.synthetic.main.activity_main.*
import java.io.DataInputStream
import java.io.DataOutputStream
import java.net.*
import kotlin.properties.Delegates
class MainActivity : AppCompatActivity() {
companion object{
var socket = Socket()
var server = ServerSocket()
lateinit var writeSocket: DataOutputStream
lateinit var readSocket: DataInputStream
lateinit var cManager: ConnectivityManager
lateinit var myIp: String
var ip = "192.168.0.1"
var port = 2222
//var mHandler = Handler() -> API30부터 Deprecated됨. Looper를 직접 명시해야함
var mHandler = Handler(Looper.getMainLooper())
var serverClosed = true
var cList = mutableListOf<Client>()
}
override fun onCreate(savedInstanceState: Bundle?) {
super.onCreate(savedInstanceState)
setContentView(R.layout.activity_main)
cManager = applicationContext.getSystemService(Context.CONNECTIVITY_SERVICE) as ConnectivityManager
server.close()
socket.close()
button_connect.setOnClickListener { //클라이언트 -> 서버 접속
if(et_ip.text.isNotEmpty()) {
ip = et_ip.text.toString()
myIp = et_name.text.toString()
if(et_port.text.isNotEmpty()) {
port = et_port.text.toString().toInt()
if(port<0 || port>65535){
Toast.makeText(this@MainActivity, "PORT 번호는 0부터 65535까지만 가능합니다.", Toast.LENGTH_SHORT).show()
}else{
if(!socket.isClosed){
Toast.makeText(this@MainActivity, ip + "에 이미 연결되어 있습니다.", Toast.LENGTH_SHORT).show()
}else {
Connect().start()
}
}
}else{
Toast.makeText(this@MainActivity, "PORT 번호를 입력해주세요.", Toast.LENGTH_SHORT).show()
}
}else{
Toast.makeText(this@MainActivity, "IP 주소를 입력해주세요.", Toast.LENGTH_SHORT).show()
}
}
button_disconnect.setOnClickListener { //클라이언트 -> 서버 접속 끊기
if(!socket.isClosed){
Disconnect().start()
}else{
Toast.makeText(this@MainActivity, "서버와 연결이 되어있지 않습니다.", Toast.LENGTH_SHORT).show()
}
}
button_setserver.setOnClickListener{ //서버 포트 열기
if(et_port.text.isNotEmpty()) {
val cport = et_port.text.toString().toInt()
if(cport<0 || cport>65535){
Toast.makeText(this@MainActivity, "PORT 번호는 0부터 65535까지만 가능합니다.", Toast.LENGTH_SHORT).show()
}else{
if(server.isClosed) {
port = cport
SetServer().start()
}else{
val tstr = port.toString() + "번 포트가 열려있습니다."
Toast.makeText(this@MainActivity, tstr, Toast.LENGTH_SHORT).show()
}
}
}else{
Toast.makeText(this@MainActivity, "PORT 번호를 입력해주세요.", Toast.LENGTH_SHORT).show()
}
}
button_closeserver.setOnClickListener { //서버 포트 닫기
if(!server.isClosed){
CloseServer().start()
}else{
mHandler.obtainMessage(17).apply {
sendToTarget()
}
}
}
button_clear.setOnClickListener { //채팅방 내용 지우기
text_status.text = ""
}
button_msg.setOnClickListener { //상대에게 메시지 전송
if(socket.isClosed){
Toast.makeText(this@MainActivity, "연결이 되어있지 않습니다.", Toast.LENGTH_SHORT).show()
}else {
val mThread = SendMessage()
mThread.setMsg(2, et_name.text.toString(), et_msg.text.toString())
mThread.start()
}
}
mHandler = object : Handler(Looper.getMainLooper()){ //Thread들로부터 Handler를 통해 메시지를 수신
override fun handleMessage(msg: Message) {
super.handleMessage(msg)
when(msg.what){
1->Toast.makeText(this@MainActivity, "IP 주소가 잘못되었거나 서버의 포트가 개방되지 않았습니다.", Toast.LENGTH_SHORT).show()
2->Toast.makeText(this@MainActivity, "서버 포트 "+port +"가 준비되었습니다.", Toast.LENGTH_SHORT).show()
3->Toast.makeText(this@MainActivity, msg.obj.toString(), Toast.LENGTH_SHORT).show()
4->Toast.makeText(this@MainActivity, "연결이 종료되었습니다.", Toast.LENGTH_SHORT).show()
5->Toast.makeText(this@MainActivity, "이미 사용중인 포트입니다.", Toast.LENGTH_SHORT).show()
6->Toast.makeText(this@MainActivity, "서버 준비에 실패하였습니다.", Toast.LENGTH_SHORT).show()
7->Toast.makeText(this@MainActivity, "서버가 종료되었습니다.", Toast.LENGTH_SHORT).show()
8->Toast.makeText(this@MainActivity, "서버가 정상적으로 닫히는데 실패하였습니다.", Toast.LENGTH_SHORT).show()
9-> ((text_status.text as String) + (msg.obj as String) + "\n").also { text_status.text = it }
11->Toast.makeText(this@MainActivity, "서버에 접속하였습니다.", Toast.LENGTH_SHORT).show()
12->Toast.makeText(this@MainActivity, "메시지 전송에 실패하였습니다.", Toast.LENGTH_SHORT).show()
13->Toast.makeText(this@MainActivity, (msg.obj as String) + " 클라이언트와 연결되었습니다.",Toast.LENGTH_SHORT).show()
14->Toast.makeText(this@MainActivity,"서버에서 응답이 없습니다.", Toast.LENGTH_SHORT).show()
15->Toast.makeText(this@MainActivity, "서버와의 연결을 종료합니다.", Toast.LENGTH_SHORT).show()
16->Toast.makeText(this@MainActivity, (msg.obj as String)+" 클라이이언트와의 연결을 종료합니다.", Toast.LENGTH_SHORT).show()
17->Toast.makeText(this@MainActivity, "포트가 이미 닫혀있습니다.", Toast.LENGTH_SHORT).show()
18->Toast.makeText(this@MainActivity, "서버와의 연결이 끊어졌습니다.", Toast.LENGTH_SHORT).show()
19->Toast.makeText(this@MainActivity, "인터넷이 연결되지 않았습니다. 연결 후 다시 시도하세요.", Toast.LENGTH_LONG).show()
20->{
et_name.setText(msg.obj as String)
myIp = msg.obj as String
}
}
}
}
ShowInfo().start() //자신의 IP주소 확인
}
//클라이언트-서버 접속 시도
class Connect:Thread(){
override fun run() = try{
socket = Socket(ip, port)
writeSocket = DataOutputStream(socket.getOutputStream())
readSocket = DataInputStream(socket.getInputStream())
val b = readSocket.readInt()
if(b==1){ //서버로부터 접속이 확인되었을 때
mHandler.obtainMessage(11).apply {
sendToTarget()
}
ClientSocket(myIp).start()
}else{ //서버 접속에 성공하였으나 서버가 응답을 하지 않았을 때
mHandler.obtainMessage(14).apply {
sendToTarget()
}
socket.close()
}
}catch(e:Exception){ //연결 실패
val state = 1
mHandler.obtainMessage(state).apply {
sendToTarget()
}
socket.close()
}
}
//클라이언트-서버 통신 개시
class ClientSocket(private val addr: String):Thread(){
override fun run() {
try{
while (true) {
val ac = readSocket.readInt()
val cname = readSocket.readUTF()
if( ac == 3){
readSocket.readUTF()
if(addr != cname){
mHandler.obtainMessage(9, "$cname 님이 입장하였습니다.").apply {
sendToTarget()
}
}else{
mHandler.obtainMessage(9, "채팅방에 입장하였습니다.").apply {
sendToTarget()
}
}
}else if(ac == 2) { //서버로부터 메시지 수신 명령을 받았을 때
val bac = readSocket.readUTF()
val input = bac.toString()
val recvInput = input.trim()
val clientName = cname.toString().trim()
val msg = mHandler.obtainMessage()
msg.what = 9
msg.obj = "$clientName> $recvInput"
mHandler.sendMessage(msg)
}else if(ac == 4){
readSocket.readUTF()
if(addr != cname) {
mHandler.obtainMessage(9, "$cname 님이 퇴장하였습니다.").apply {
sendToTarget()
}
}
}else if(ac == 10){ //서버로부터 접속 종료 명령을 받았을 때
mHandler.obtainMessage(18).apply {
sendToTarget()
}
mHandler.obtainMessage(9,"서버에서 연결을 끊었습니다.").apply {
sendToTarget()
}
socket.close()
break
}
}
}catch(e:SocketException){ //소켓이 닫혔을 때
mHandler.obtainMessage(15).apply {
sendToTarget()
}
mHandler.obtainMessage(9, "채팅방을 나갔습니다.").apply {
sendToTarget()
}
}
}
}
//클라이언트 접속 종료
class Disconnect:Thread(){
override fun run() {
try{
writeSocket.write(10) //서버에게 접속 종료 명령 전송
writeSocket.writeUTF(myIp) //종료 요청 클라이언트 주소
socket.close()
}catch(e:Exception){
}
}
}
//서버 통신 개시
class SetServer:Thread(){
override fun run(){
try{
server = ServerSocket(port) //포트 개방
mHandler.obtainMessage(2, "").apply {
sendToTarget()
}
mHandler.obtainMessage(9, "서버가 열렸습니다.").apply {
sendToTarget()
}
while(true) {
socket = server.accept() //클라이언트가 접속할 때 까지 대기
val client = Client(socket) //접속한 Client의 socket을 저장
cList.add(client) //접속 client socket 리스트 추가
client.start() //접속한 클라이언트 전용 socket thread 실행
}
}catch(e:BindException) { //이미 개방된 포트를 개방하려 시도하였을때
mHandler.obtainMessage(5).apply {
sendToTarget()
}
}catch(e:SocketException){ //소켓이 닫혔을 때
mHandler.obtainMessage(7).apply {
sendToTarget()
}
}
catch(e:Exception){
if(!serverClosed) {
mHandler.obtainMessage(6).apply {
sendToTarget()
}
}else{
serverClosed = false
}
}
}
}
//서버 소켓 닫기
class CloseServer:Thread(){
override fun run(){
try{
if(!socket.isClosed){
writeSocket.write(10) //클라이언트에게 서버가 종료되었음을 알림
writeSocket.close()
socket.close()
}
server.close()
serverClosed = true
mHandler.obtainMessage(9, "서버가 닫혔습니다.").apply {
sendToTarget()
}
}catch(e:Exception){
e.printStackTrace()
mHandler.obtainMessage(8).apply {
sendToTarget()
}
}
}
}
//메시지 전송
class SendMessage:Thread(){
private var state by Delegates.notNull<Int>()
private lateinit var msg:String
private lateinit var cname:String
fun setMsg(s: Int, n:String, m:String){
state = s
msg = m
cname = n
}
override fun run() {
if(cList.size>0){ //메시지를 전송하는 주체가 서버일 경우
val cIter = cList.iterator()
while(cIter.hasNext()){
val client = cIter.next()
if (!client.isClosed()) client.sendMessage(state, cname, msg)
else cIter.remove()
mHandler.obtainMessage(9, "$cname> $msg").apply {
sendToTarget()
}
}
}else {
try {
writeSocket.writeInt(state) //메시지 전송 명령 전송
writeSocket.writeUTF(cname) //클라이언트 이름
writeSocket.writeUTF(msg) //메시지 내용
} catch (e: Exception) {
e.printStackTrace()
mHandler.obtainMessage(12).apply {
sendToTarget()
}
}
}
}
}
//자신의 IP주소를 표시
class ShowInfo:Thread() {
override fun run() {
var ip = ""
val en = NetworkInterface.getNetworkInterfaces()
while (en.hasMoreElements()) {
val intf = en.nextElement()
val enumIpAddr = intf.inetAddresses
while (enumIpAddr.hasMoreElements()) {
val inetAddress = enumIpAddr.nextElement()
if (!inetAddress.isLoopbackAddress && inetAddress is Inet4Address) {
@Suppress("RECEIVER_NULLABILITY_MISMATCH_BASED_ON_JAVA_ANNOTATIONS")
ip = inetAddress.hostAddress as String
}
}
}
if (ip == "") {
mHandler.obtainMessage(19).apply {
sendToTarget()
}
} else {
val msg = mHandler.obtainMessage()
msg.what = 20
msg.obj = ip
mHandler.sendMessage(msg)
}
}
}
//서버에 접속한 클라이언트 소켓 제어
class Client(socket: Socket) : Thread(){
private lateinit var clientName: String
private lateinit var clientAddr: String
private lateinit var cWriteSocket: DataOutputStream
private val cSocket: Socket=socket
override fun run(){
cWriteSocket = DataOutputStream(cSocket.getOutputStream())
val cReadSocket = DataInputStream(cSocket.getInputStream())
cWriteSocket.writeInt(1) //클라이언트에게 서버의 소켓 생성을 알림
val socketAddr = socket.remoteSocketAddress as InetSocketAddress
clientAddr = socketAddr.address.hostAddress as String
mHandler.obtainMessage(13, clientAddr).apply {
sendToTarget()
}
mHandler.obtainMessage(9, clientAddr + "님이 입장하였습니다.").apply {
sendToTarget()
}
Broadcast(cList, 3, clientAddr, "입장").start()
while (true) {
val ac = cReadSocket.read()
clientName = cReadSocket.readUTF().toString()
if(ac==10){ //클라이언트로부터 소켓 종료 명령 수신
mHandler.obtainMessage(16, clientName).apply {
sendToTarget()
}
mHandler.obtainMessage(9, "$clientName 님이 퇴장하였습니다.").apply {
sendToTarget()
}
Broadcast(cList, 4, clientName, "퇴장").start()
break
}else if(ac == 2){ //클라이언트로부터 메시지 전송 명령 수신
val bac = cReadSocket.readUTF()
val input = bac.toString()
val recvInput = input.trim()
val msg = mHandler.obtainMessage()
msg.what = 9
msg.obj = "$clientName> $recvInput"
mHandler.sendMessage(msg) //핸들러에게 클라이언트로 전달받은 메시지 전송
Broadcast(cList, 2, clientName, recvInput).start()
}
}
cWriteSocket.close()
cSocket.close()
}
fun isClosed(): Boolean {
return cSocket.isClosed
}
fun sendMessage(state: Int, cname: String, msg: String){
try{
cWriteSocket.writeInt(state) //메시지 전송 명령 전송
cWriteSocket.writeUTF(cname) //클라이언트 이름
cWriteSocket.writeUTF(msg) //메시지 내용
}catch(e:Exception){
e.printStackTrace()
mHandler.obtainMessage(12).apply {
sendToTarget()
}
}
}
}
//서버에 접속한 클라이언트에게 메시지 전파
class Broadcast(private val cList: MutableList<Client>, private val state: Int, private val cname: String, private val msg: String):Thread(){
override fun run(){
if(cList.size>0){
val cIter = cList.iterator()
while(cIter.hasNext()){
val client = cIter.next()
if (!client.isClosed()) {
client.sendMessage(state, cname, msg)
}
else cIter.remove()
}
}
}
}
}
|
cs |
실행 결과는 다음과 같습니다.
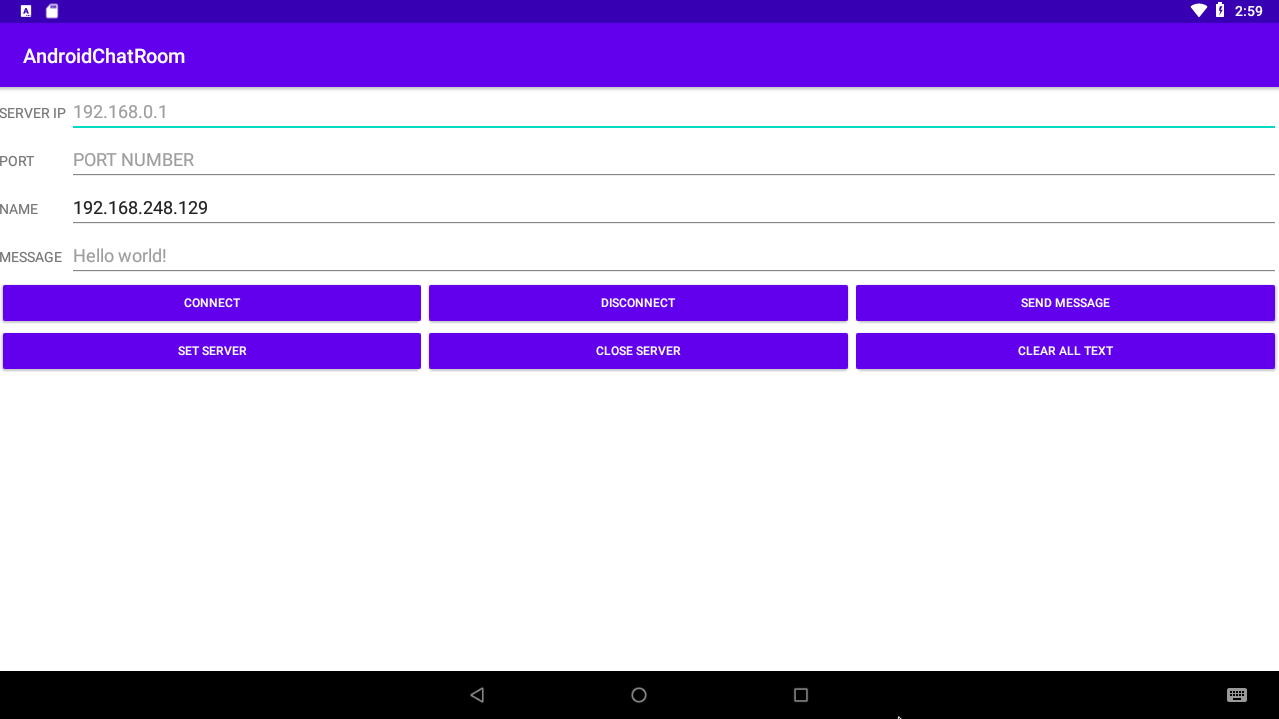
※Sever 사용 방법
1. Port에 원하는 포트 번호를 입력합니다.
2. 'SET SERVER' 버튼을 클릭하면 포트를 열 수 있습니다. 만약 다른 프로세스에서 포트를 사용중일 경우 다른 포트 번호를 입력합니다.
3. 인터넷이 연결된 상태에서 앱을 실행시 NAME에 Server의 IP주소가 나타납니다. 이를 Client의 IP란에 입력해주세요.
4. Client와의 연결이 성공하면 Toast로 연결에 성공하였다는 알림이 나옵니다.
※Client 사용 방법
1. IP와 PORT에 서버의 IP주소와 설정 PORT 번호를 입력합니다.
2. 'CONNECT' 버튼을 클릭하여 서버에 접속합니다. 성공시 Toast로 접속에 성공하였다는 메시지를 확인하실 수 있습니다.
3. 'SEND MESSAGE' 버튼을 클릭하면 MESSAGE 칸에 입력한 텍스트 정보를 상대에게 전송할 수 있습니다.
4. 'DISCONNECT' 버튼을 눌러 서버와의 연결을 해제합니다.
실험을 위해 저희 가족들이 사용하고 있는 폰들을 모두 모아 실험에 사용하였습니다.
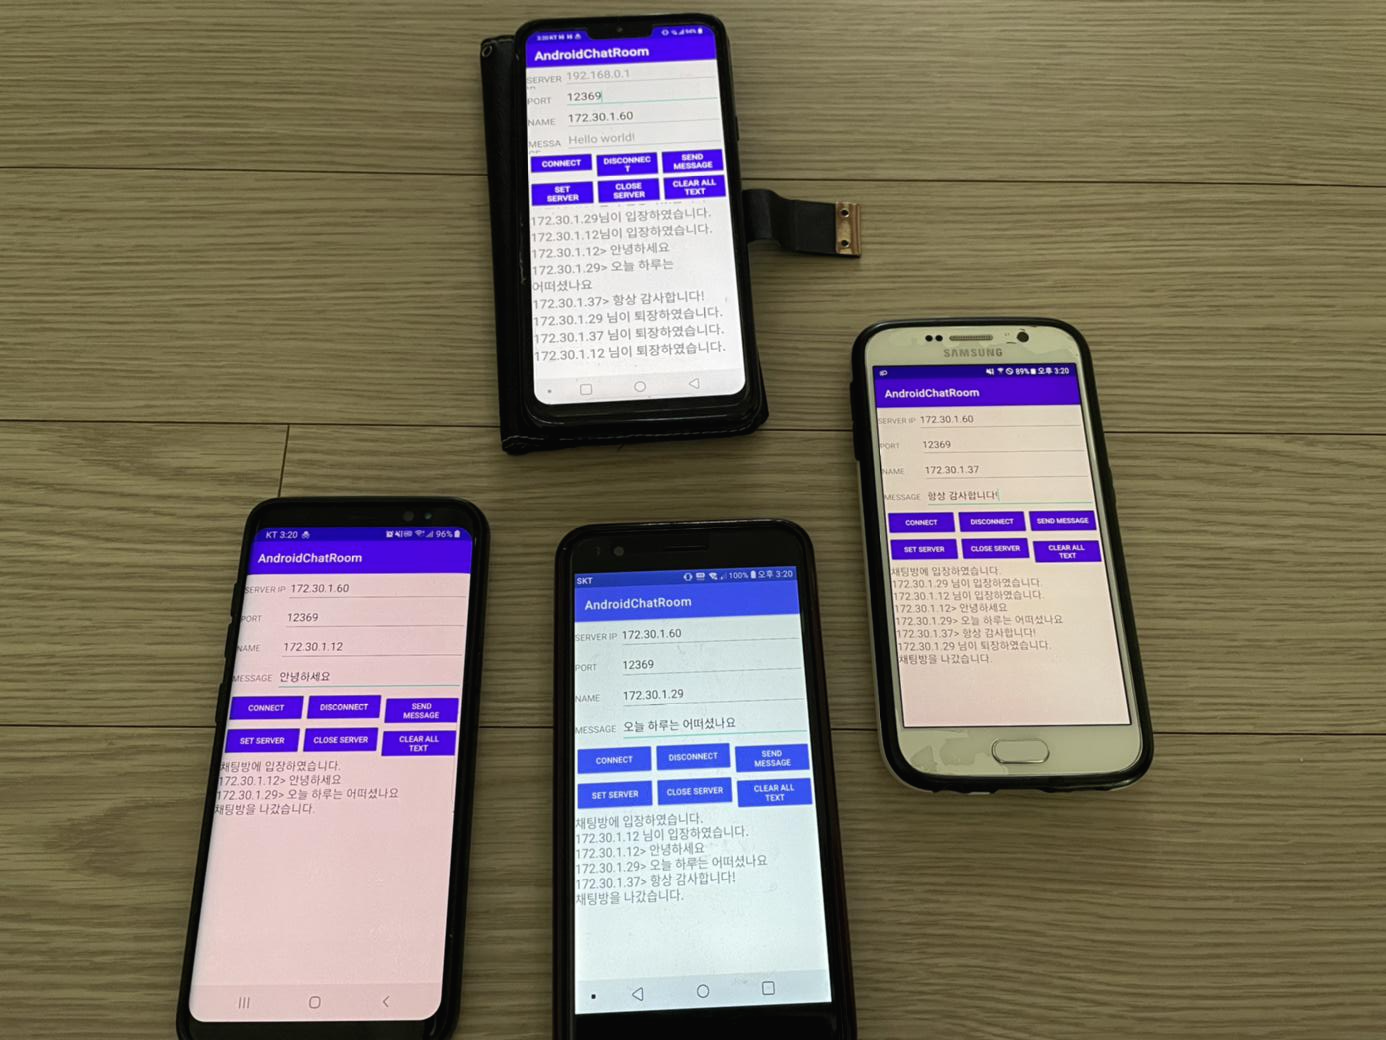
맨 위의 폰이 Server 역할을 하고 있으며 나머지 3개의 폰은 Client 역할을 하고 있습니다.
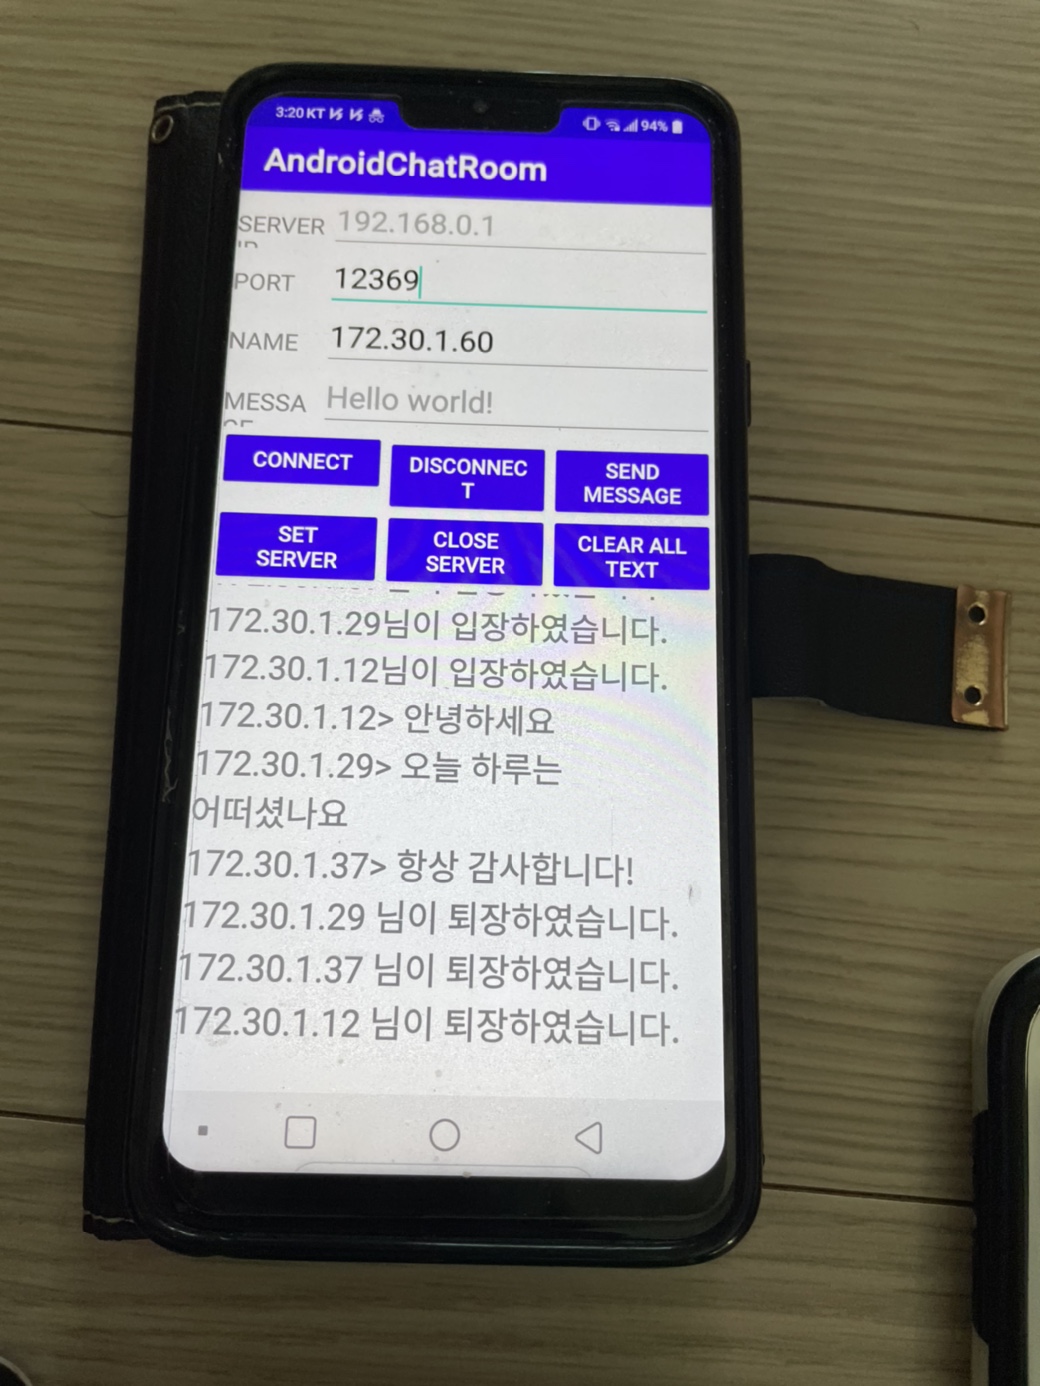
Server에서는 각 클라이언트의 메시지와 접속 상황을 실시간으로 보여줍니다.
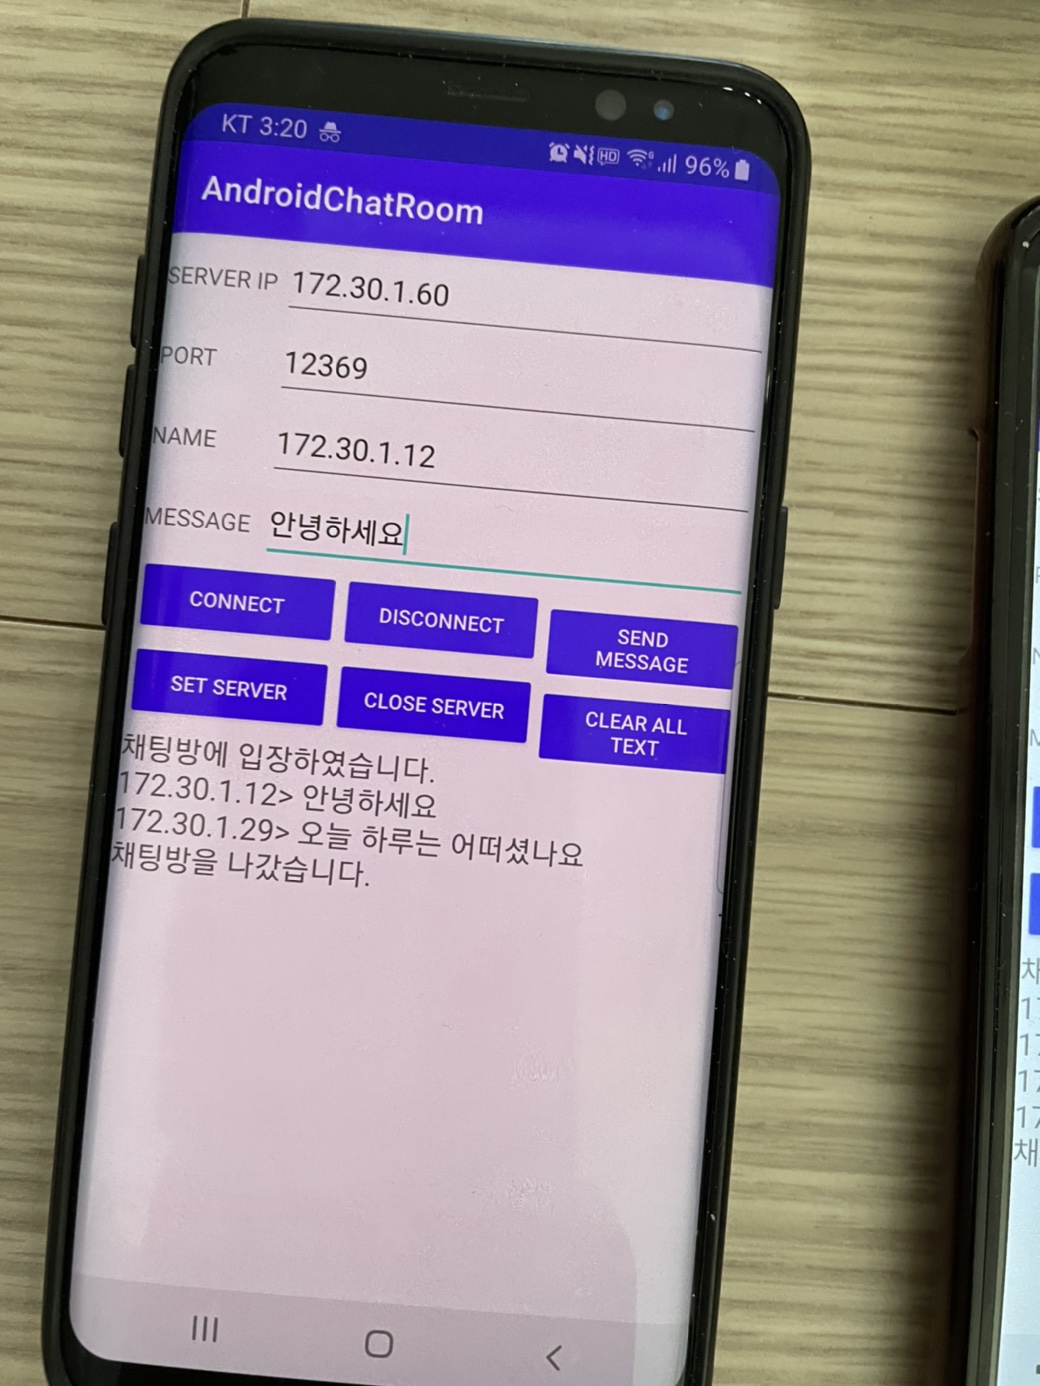
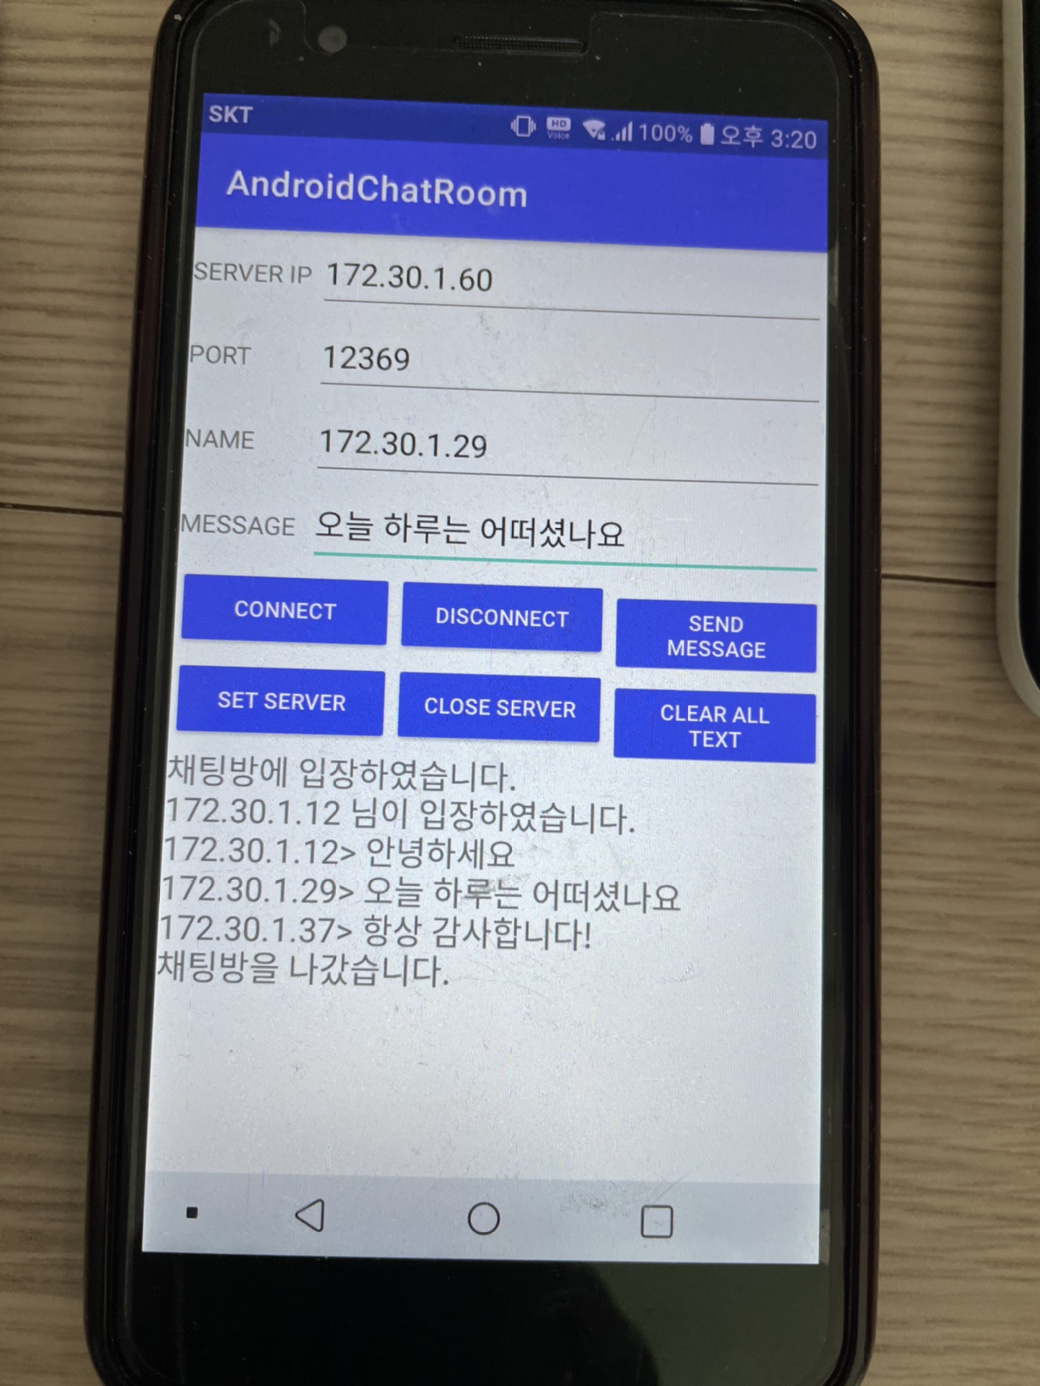
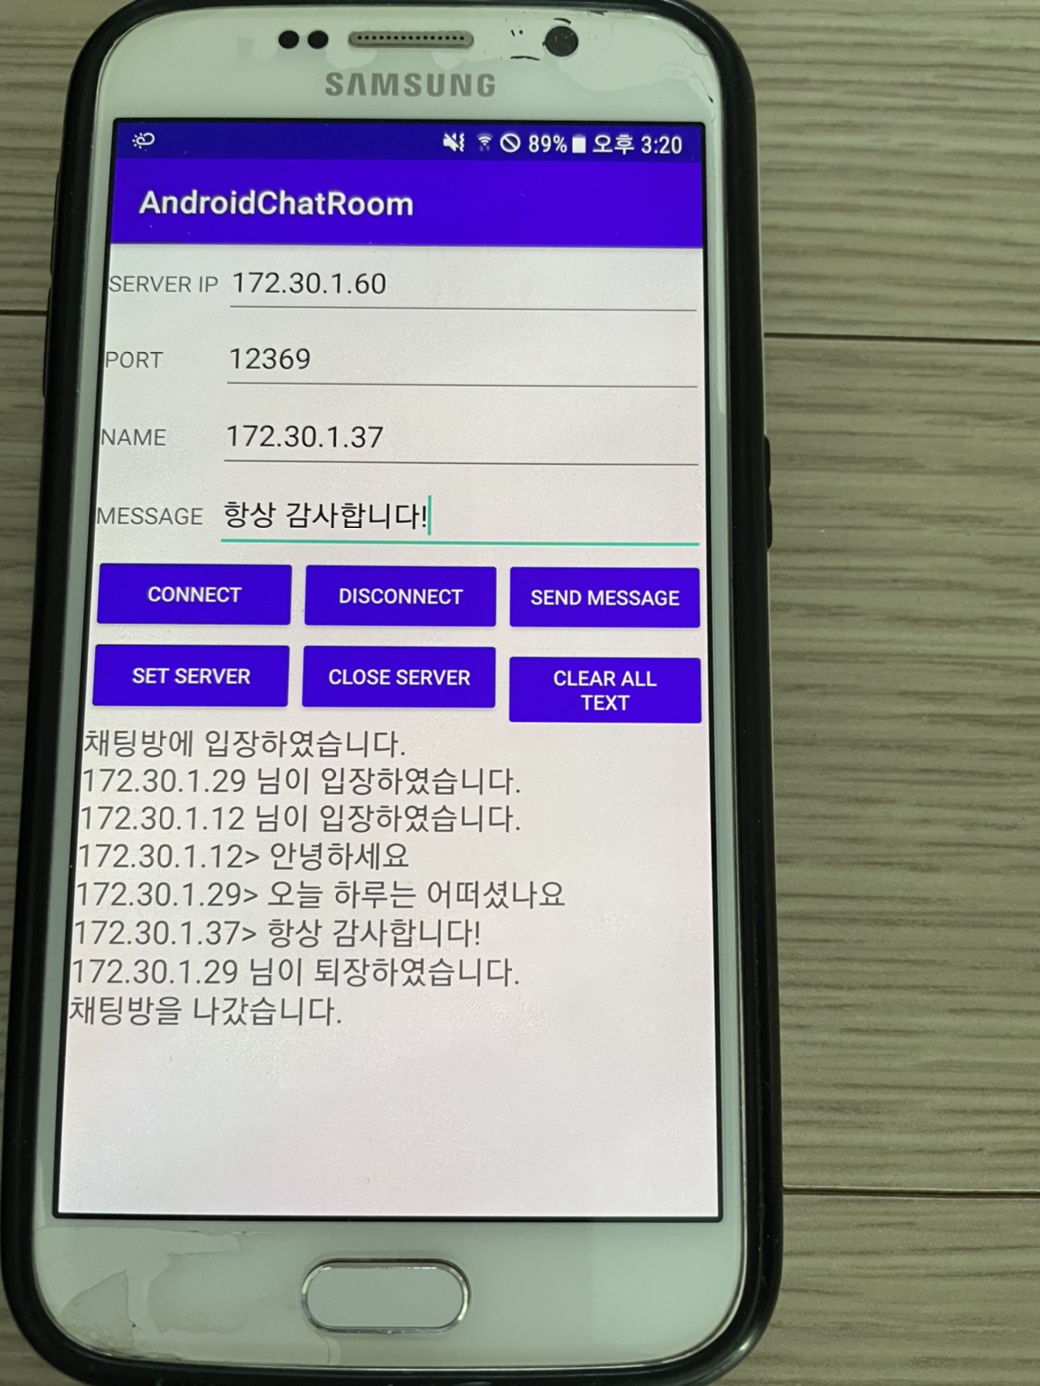
일부 클라이언트 접속 상황이 제대로 반영되지 않은 것으로 보이나 정상적으로 서버와의 통신 및 채팅방 대화가 공유되는 것을 확인하실 수 있습니다!
'안드로이드 > 애플리케이션 제작' 카테고리의 다른 글
설정
트랙백
댓글
글
안드로이드 기기 간에 Wifi Socket 통신하기(Kotlin)
오랜만에 안드로이드를 다루어보는 기회가 생겼는데 생각보다 많은 변화가 있었습니다. 특히 올해부터는 구글에서 새로 만든 프로그래밍 언어인 Kotlin이 도입되면서 Java 위주로 설계된 안드로이드 생태계에 거대한 변화가 있을 것으로 보입니다. 이러한 안드로이드의 환경 변화에 맞추어 제가 기존에 다루었던 프로그램들을 Kotlin으로 다시 한 번 설계해보려고 합니다.
이전에 안드로이드 기기간의 Wi-Fi 통신 프로그래밍을 설계하였던 적이 있었는데 Kotlin으로 다시 짜보는 김에 프로그램을 최적화 해서 다시 만들어보았습니다.
AndroidMenifest.xml
1 2 3 4 5 6 7 8 9 10 11 12 13 14 15 16 17 18 19 20 21 22 23 24 25 | <?xml version="1.0" encoding="utf-8"?> <manifest xmlns:android="http://schemas.android.com/apk/res/android" package="com.elecs.interandroidcommunication"> <uses-permission android:name="android.permission.INTERNET"/> <uses-permission android:name="android.permission.ACCESS_NETWORK_STATE"/> <uses-permission android:name="android.permission.ACCESS_WIFI_STATE"/> <application android:allowBackup="true" android:icon="@mipmap/ic_launcher" android:label="@string/app_name" android:roundIcon="@mipmap/ic_launcher_round" android:supportsRtl="true" android:theme="@style/AppTheme"> <activity android:name=".MainActivity"> <intent-filter> <action android:name="android.intent.action.MAIN" /> <category android:name="android.intent.category.LAUNCHER" /> </intent-filter> </activity> </application> </manifest> | cs |
strings.xml
1 2 3 4 5 6 7 8 9 10 11 12 13 14 15 16 17 18 19 | <resources> <string name="app_name">IAC</string> <string name="hello_world">Hello world!</string> <string name="action_settings">Settings</string> <string name="ip">IP</string> <string name="port">PORT</string> <string name="name">NAME</string> <string name="msg">MESSAGE</string> <string name="hint_port">PORT NUMBER</string> <string name="hint_ip">192.168.0.1</string> <string name="hint_msg">Hello, world!</string> <string name="button1">Connect</string> <string name="button2">Disconnect</string> <string name="button3">Set Server</string> <string name="button4">Close Server</string> <string name="button5">View my info</string> <string name="button6">Send Message</string> </resources> | cs |
activity_main.xml
1 2 3 4 5 6 7 8 9 10 11 12 13 14 15 16 17 18 19 20 21 22 23 24 25 26 27 28 29 30 31 32 33 34 35 36 37 38 39 40 41 42 43 44 45 46 47 48 49 50 51 52 53 54 55 56 57 58 59 60 61 62 63 64 65 66 67 68 69 70 71 72 73 74 75 76 77 78 79 80 81 82 83 84 85 86 87 88 89 90 91 92 93 94 95 96 97 98 99 100 101 102 103 104 105 106 107 108 109 110 111 112 113 114 115 116 117 118 119 120 121 122 123 124 125 126 127 128 129 130 131 132 133 134 135 136 137 138 139 140 141 142 143 144 145 146 147 148 149 150 151 152 153 154 155 156 157 158 159 | <?xml version="1.0" encoding="utf-8"?> <androidx.constraintlayout.widget.ConstraintLayout xmlns:android="http://schemas.android.com/apk/res/android" xmlns:app="http://schemas.android.com/apk/res-auto" xmlns:tools="http://schemas.android.com/tools" android:layout_width="match_parent" android:layout_height="match_parent" tools:context=".MainActivity"> <LinearLayout android:layout_width="match_parent" android:layout_height="match_parent" android:orientation="vertical"> <LinearLayout android:layout_width="match_parent" android:layout_height="wrap_content" android:orientation="horizontal"> <TextView android:id="@+id/textView" android:layout_width="70dp" android:layout_height="wrap_content" android:text="@string/ip" /> <EditText android:id="@+id/et_ip" android:layout_width="match_parent" android:layout_height="wrap_content" android:ems="10" android:hint="@string/hint_ip" android:importantForAccessibility="no" tools:ignore="Autofill" android:inputType="textUri" android:singleLine="true" /> </LinearLayout> <LinearLayout android:layout_width="match_parent" android:layout_height="wrap_content" android:orientation="horizontal"> <TextView android:id="@+id/textView2" android:layout_width="70dp" android:layout_height="wrap_content" android:text="@string/port" /> <EditText android:id="@+id/et_port" android:layout_width="match_parent" android:layout_height="wrap_content" android:ems="10" android:hint="@string/hint_port" android:importantForAccessibility="no" tools:ignore="Autofill" android:inputType="number" android:singleLine="true" /> </LinearLayout> <LinearLayout android:layout_width="match_parent" android:layout_height="wrap_content" android:orientation="horizontal"> <TextView android:id="@+id/textView3" android:layout_width="70dp" android:layout_height="wrap_content" android:text="@string/msg" /> <EditText android:id="@+id/et_msg" android:layout_width="match_parent" android:layout_height="wrap_content" android:ems="10" android:hint="@string/hello_world" android:importantForAccessibility="no" tools:ignore="Autofill" android:inputType="textPersonName" /> </LinearLayout> <LinearLayout android:layout_width="match_parent" android:layout_height="wrap_content" android:orientation="horizontal"> <Button android:id="@+id/button_connect" style="@style/Widget.AppCompat.Button.Small" android:layout_width="0dp" android:layout_height="wrap_content" android:layout_weight="1" android:minWidth="0dip" android:text="@string/button1" android:textSize="12sp" /> <Button android:id="@+id/button_disconnect" style="@style/Widget.AppCompat.Button.Small" android:layout_width="0dp" android:layout_height="wrap_content" android:layout_weight="1" android:minWidth="0dip" android:text="@string/button2" android:textSize="12sp" /> <Button android:id="@+id/button_msg" style="@style/Widget.AppCompat.Button.Small" android:layout_width="0dp" android:layout_height="wrap_content" android:layout_weight="1" android:minWidth="0dip" android:text="@string/button6" android:textSize="12sp" /> </LinearLayout> <LinearLayout android:layout_width="match_parent" android:layout_height="wrap_content" android:orientation="horizontal"> <Button android:id="@+id/button_setserver" style="@style/Widget.AppCompat.Button.Small" android:layout_width="0dp" android:layout_height="wrap_content" android:layout_weight="1" android:text="@string/button3" android:textSize="12sp" /> <Button android:id="@+id/button_closeserver" style="@style/Widget.AppCompat.Button.Small" android:layout_width="0dp" android:layout_height="wrap_content" android:layout_weight="1" android:text="@string/button4" android:textSize="12sp" /> <Button android:id="@+id/button_info" style="@style/Widget.AppCompat.Button.Small" android:layout_width="0dp" android:layout_height="wrap_content" android:layout_weight="1" android:text="@string/button5" android:textSize="12sp" /> </LinearLayout> <TextView android:id="@+id/text_status" android:layout_width="match_parent" android:layout_height="wrap_content" /> </LinearLayout> </androidx.constraintlayout.widget.ConstraintLayout> | cs |
MainActivity.kt
1 2 3 4 5 6 7 8 9 10 11 12 13 14 15 16 17 18 19 20 21 22 23 24 25 26 27 28 29 30 31 32 33 34 35 36 37 38 39 40 41 42 43 44 45 46 47 48 49 50 51 52 53 54 55 56 57 58 59 60 61 62 63 64 65 66 67 68 69 70 71 72 73 74 75 76 77 78 79 80 81 82 83 84 85 86 87 88 89 90 91 92 93 94 95 96 97 98 99 100 101 102 103 104 105 106 107 108 109 110 111 112 113 114 115 116 117 118 119 120 121 122 123 124 125 126 127 128 129 130 131 132 133 134 135 136 137 138 139 140 141 142 143 144 145 146 147 148 149 150 151 152 153 154 155 156 157 158 159 160 161 162 163 164 165 166 167 168 169 170 171 172 173 174 175 176 177 178 179 180 181 182 183 184 185 186 187 188 189 190 191 192 193 194 195 196 197 198 199 200 201 202 203 204 205 206 207 208 209 210 211 212 213 214 215 216 217 218 219 220 221 222 223 224 225 226 227 228 229 230 231 232 233 234 235 236 237 238 239 240 241 242 243 244 245 246 247 248 249 250 251 252 253 254 255 256 257 258 259 260 261 262 263 264 265 266 267 268 269 270 271 272 273 274 275 276 277 278 279 280 281 282 283 284 285 286 287 288 289 290 291 292 293 294 295 296 297 298 299 300 301 302 303 304 305 306 307 308 309 310 311 312 313 314 315 316 317 318 319 320 321 322 323 324 325 326 327 328 329 330 331 332 333 334 335 | package com.elecs.interandroidcommunication import android.content.Context import android.net.ConnectivityManager import android.os.Bundle import android.os.Handler import android.os.Looper import android.os.Message import android.widget.Toast import androidx.appcompat.app.AppCompatActivity import kotlinx.android.synthetic.main.activity_main.* import java.io.DataInputStream import java.io.DataOutputStream import java.net.* class MainActivity : AppCompatActivity() { companion object{ var socket = Socket() var server = ServerSocket() lateinit var writeSocket: DataOutputStream lateinit var readSocket: DataInputStream lateinit var cManager: ConnectivityManager var ip = "192.168.0.1" var port = 2222 var mHandler = Handler() var closed = false } override fun onCreate(savedInstanceState: Bundle?) { super.onCreate(savedInstanceState) setContentView(R.layout.activity_main) cManager = applicationContext.getSystemService(Context.CONNECTIVITY_SERVICE) as ConnectivityManager server.close() socket.close() button_connect.setOnClickListener { //클라이언트 -> 서버 접속 if(et_ip.text.isNotEmpty()) { ip = et_ip.text.toString() if(et_port.text.isNotEmpty()) { port = et_port.text.toString().toInt() if(port<0 || port>65535){ Toast.makeText(this@MainActivity, "PORT 번호는 0부터 65535까지만 가능합니다.", Toast.LENGTH_SHORT).show() }else{ if(!socket.isClosed){ Toast.makeText(this@MainActivity, ip + "에 이미 연결되어 있습니다.", Toast.LENGTH_SHORT).show() }else { Connect().start() } } }else{ Toast.makeText(this@MainActivity, "PORT 번호를 입력해주세요.", Toast.LENGTH_SHORT).show() } }else{ Toast.makeText(this@MainActivity, "IP 주소를 입력해주세요.", Toast.LENGTH_SHORT).show() } } button_disconnect.setOnClickListener { //클라이언트 -> 서버 접속 끊기 if(!socket.isClosed){ Disconnect().start() }else{ Toast.makeText(this@MainActivity, "서버와 연결이 되어있지 않습니다.", Toast.LENGTH_SHORT).show() } } button_setserver.setOnClickListener{ //서버 포트 열기 if(et_port.text.isNotEmpty()) { val cport = et_port.text.toString().toInt() if(cport<0 || cport>65535){ Toast.makeText(this@MainActivity, "PORT 번호는 0부터 65535까지만 가능합니다.", Toast.LENGTH_SHORT).show() }else{ if(server.isClosed) { port = cport SetServer().start() }else{ val tstr = port.toString() + "번 포트가 열려있습니다." Toast.makeText(this@MainActivity, tstr, Toast.LENGTH_SHORT).show() } } }else{ Toast.makeText(this@MainActivity, "PORT 번호를 입력해주세요.", Toast.LENGTH_SHORT).show() } } button_closeserver.setOnClickListener { //서버 포트 닫기 if(!server.isClosed){ CloseServer().start() }else{ mHandler.obtainMessage(17).apply { sendToTarget() } } } button_info.setOnClickListener { //자기자신의 연결 정보(IP 주소)확인 ShowInfo().start() } button_msg.setOnClickListener { //상대에게 메시지 전송 if(socket.isClosed){ Toast.makeText(this@MainActivity, "연결이 되어있지 않습니다.", Toast.LENGTH_SHORT).show() }else { val mThread = SendMessage() mThread.setMsg(et_msg.text.toString()) mThread.start() } } mHandler = object : Handler(Looper.getMainLooper()){ //Thread들로부터 Handler를 통해 메시지를 수신 override fun handleMessage(msg: Message) { super.handleMessage(msg) when(msg.what){ 1->Toast.makeText(this@MainActivity, "IP 주소가 잘못되었거나 서버의 포트가 개방되지 않았습니다.", Toast.LENGTH_SHORT).show() 2->Toast.makeText(this@MainActivity, "서버 포트 "+port +"가 준비되었습니다.", Toast.LENGTH_SHORT).show() 3->Toast.makeText(this@MainActivity, msg.obj.toString(), Toast.LENGTH_SHORT).show() 4->Toast.makeText(this@MainActivity, "연결이 종료되었습니다.", Toast.LENGTH_SHORT).show() 5->Toast.makeText(this@MainActivity, "이미 사용중인 포트입니다.", Toast.LENGTH_SHORT).show() 6->Toast.makeText(this@MainActivity, "서버 준비에 실패하였습니다.", Toast.LENGTH_SHORT).show() 7->Toast.makeText(this@MainActivity, "서버가 종료되었습니다.", Toast.LENGTH_SHORT).show() 8->Toast.makeText(this@MainActivity, "서버가 정상적으로 닫히는데 실패하였습니다.", Toast.LENGTH_SHORT).show() 9-> text_status.text = msg.obj as String 11->Toast.makeText(this@MainActivity, "서버에 접속하였습니다.", Toast.LENGTH_SHORT).show() 12->Toast.makeText(this@MainActivity, "메시지 전송에 실패하였습니다.", Toast.LENGTH_SHORT).show() 13->Toast.makeText(this@MainActivity, "클라이언트와 연결되었습니다.",Toast.LENGTH_SHORT).show() 14->Toast.makeText(this@MainActivity,"서버에서 응답이 없습니다.", Toast.LENGTH_SHORT).show() 15->Toast.makeText(this@MainActivity, "서버와의 연결을 종료합니다.", Toast.LENGTH_SHORT).show() 16->Toast.makeText(this@MainActivity, "클라이언트와의 연결을 종료합니다.", Toast.LENGTH_SHORT).show() 17->Toast.makeText(this@MainActivity, "포트가 이미 닫혀있습니다.", Toast.LENGTH_SHORT).show() 18->Toast.makeText(this@MainActivity, "서버와의 연결이 끊어졌습니다.", Toast.LENGTH_SHORT).show() } } } } class Connect:Thread(){ override fun run(){ try{ socket = Socket(ip, port) writeSocket = DataOutputStream(socket.getOutputStream()) readSocket = DataInputStream(socket.getInputStream()) val b = readSocket.read() if(b==1){ //서버로부터 접속이 확인되었을 때 mHandler.obtainMessage(11).apply { sendToTarget() } ClientSocket().start() }else{ //서버 접속에 성공하였으나 서버가 응답을 하지 않았을 때 mHandler.obtainMessage(14).apply { sendToTarget() } socket.close() } }catch(e:Exception){ //연결 실패 val state = 1 mHandler.obtainMessage(state).apply { sendToTarget() } socket.close() } } } class ClientSocket:Thread(){ override fun run() { try{ while (true) { val ac = readSocket.read() if(ac == 2) { //서버로부터 메시지 수신 명령을 받았을 때 val bac = readSocket.readUTF() val input = bac.toString() val recvInput = input.trim() val msg = mHandler.obtainMessage() msg.what = 3 msg.obj = recvInput mHandler.sendMessage(msg) }else if(ac == 10){ //서버로부터 접속 종료 명령을 받았을 때 mHandler.obtainMessage(18).apply { sendToTarget() } socket.close() break } } }catch(e:SocketException){ //소켓이 닫혔을 때 mHandler.obtainMessage(15).apply { sendToTarget() } } } } class Disconnect:Thread(){ override fun run() { try{ writeSocket.write(10) //서버에게 접속 종료 명령 전송 socket.close() }catch(e:Exception){ } } } class SetServer:Thread(){ override fun run(){ try{ server = ServerSocket(port) //포트 개방 mHandler.obtainMessage(2, "").apply { sendToTarget() } while(true) { socket = server.accept() writeSocket = DataOutputStream(socket.getOutputStream()) readSocket = DataInputStream(socket.getInputStream()) writeSocket.write(1) //클라이언트에게 서버의 소켓 생성을 알림 mHandler.obtainMessage(13).apply { sendToTarget() } while (true) { val ac = readSocket.read() if(ac==10){ //클라이언트로부터 소켓 종료 명령 수신 mHandler.obtainMessage(16).apply { sendToTarget() } break }else if(ac == 2){ //클라이언트로부터 메시지 전송 명령 수신 val bac = readSocket.readUTF() val input = bac.toString() val recvInput = input.trim() val msg = mHandler.obtainMessage() msg.what = 3 msg.obj = recvInput mHandler.sendMessage(msg) //핸들러에게 클라이언트로 전달받은 메시지 전송 } } } }catch(e:BindException) { //이미 개방된 포트를 개방하려 시도하였을때 mHandler.obtainMessage(5).apply { sendToTarget() } }catch(e:SocketException){ //소켓이 닫혔을 때 mHandler.obtainMessage(7).apply { sendToTarget() } } catch(e:Exception){ if(!closed) { mHandler.obtainMessage(6).apply { sendToTarget() } }else{ closed = false } } } } class CloseServer:Thread(){ override fun run(){ try{ closed = true writeSocket.write(10) //클라이언트에게 서버가 종료되었음을 알림 socket.close() server.close() }catch(e:Exception){ e.printStackTrace() mHandler.obtainMessage(8).apply { sendToTarget() } } } } class SendMessage:Thread(){ private lateinit var msg:String fun setMsg(m:String){ msg = m } override fun run() { try{ writeSocket.writeInt(2) //메시지 전송 명령 전송 writeSocket.writeUTF(msg) //메시지 내용 }catch(e:Exception){ e.printStackTrace() mHandler.obtainMessage(12).apply { sendToTarget() } } } } class ShowInfo:Thread(){ override fun run(){ lateinit var ip:String var breakLoop = false val en = NetworkInterface.getNetworkInterfaces() while(en.hasMoreElements()){ val intf = en.nextElement() val enumIpAddr = intf.inetAddresses while(enumIpAddr.hasMoreElements()){ val inetAddress = enumIpAddr.nextElement() if(!inetAddress.isLoopbackAddress && inetAddress is Inet4Address){ ip = inetAddress.hostAddress.toString() breakLoop = true break } } if(breakLoop){ break } } val msg = mHandler.obtainMessage() msg.what = 9 msg.obj = ip mHandler.sendMessage(msg) } } } | cs |
위의 코드를 실행화면 다음과 같은 화면이 나타납니다.

※Sever 사용 방법
1. Port에 원하는 포트 번호를 입력합니다.
2. 'SET SERVER' 버튼을 클릭하면 포트를 열 수 있습니다. 만약 다른 프로세스에서 포트를 사용중일 경우 다른 포트 번호를 입력합니다.
3. 'VIEW MY INFO' 버튼을 클릭하면 현재 접속중인 IP주소를 알 수 있습니다. 이를 Client의 IP란에 입력해주세요.
4. Client와의 연결이 성공하면 Toast로 연결에 성공하였다는 알림이 나옵니다.
※Client 사용 방법
1. IP와 PORT에 서버의 IP주소와 설정 PORT 번호를 입력합니다.
2. 'CONNECT' 버튼을 클릭하여 서버에 접속합니다. 성공시 Toast로 접속에 성공하였다는 메시지를 확인하실 수 있습니다.
3. 'SEND MESSAGE' 버튼을 클릭하면 MESSAGE 칸에 입력한 텍스트 정보를 상대에게 전송할 수 있습니다.
4. 'DISCONNECT' 버튼을 눌러 서버와의 연결을 해제합니다.
'안드로이드 > 애플리케이션 제작' 카테고리의 다른 글
설정
트랙백
댓글
글
Cannot call LoginFragment with a null calling package. This can occur if the launchMode of the caller is singleInstance.
안드로이드 애플리케이션에 페이스북 로그인 연동을 하는 과정에서 다음과 같은 오류가 발생하였습니다.
Cannot call LoginFragment with a null calling package. This can occur if the launchMode of the caller is singleInstance.
안드로이드 애플리케이션에서 제공되는 Facebook 로그인의 경우 로그인을 호출하는 Activity에서 다른 Activity를 호출할 때 single instance 방식으로 호출할 경우 로그인 창이 실행조차 되지 않는 상황이 발생합니다. single instance 방식은 안드로이드 애플리케이션 제작에 있어 최대한 지양하도록 공식적으로 가이드 되고 있으며 Facebook 로그인 라이브러리 또한 이를 준수하기 위해 single instance 방식의 호출을 막아둔 것으로 보입니다.
이를 해결하기 위해 AndroidManifest.xml 파일을 열어 Facebook 로그인과 관련된 모든 <Activity >의 속성 안에
1 2 3 4 5 | <activity .... android:launchMode="standard" .... </activity> | cs |
위와 같이 launch mode를 single instance에서 다른 것(standard 권장)으로 변경해주시면 로그인이 되는 것을 확인하실 수 있습니다.
'안드로이드 > 애플리케이션 제작' 카테고리의 다른 글
설정
트랙백
댓글
글
안드로이드 6.0에서 SecurityException 처리방법(Call requires permission which may be rejected by user....)
안드로이드 6.0버전(API-23)부터 애플리케이션을 설치할 때 권한을 묻지 않고 그대로 설치한 후 해당 앱을 실행하는 도중 특정한 권한이 필요하게 되었을 때 사용하고자 하는 권한을 묻는 방식으로 Permission을 설정하는 방식으로 변경되었습니다.

이로 인해 안드로이드 6.0부터 애플리케이션을 제작할 때 특정 부분에서 Permission을 필요로 할 때 사용자에게 사용 여부를 묻는 방식으로 설계를 해야 합니다. 기존의 버전에서 처럼 제작을 하게 될 경우 아래와 같이 붉은 밑줄이 생기면서 설계자에게 경고를 합니다.

기존의 방식대로면 전혀 문제가 될 일이 없습니다만 안드로이드 마시멜로에서 부터는 특정 권한을 필요로 하는 작업을 수행하기 위해 액세스를 하기 직전 권한 허용 여부를 확인하여야 이 에러를 해결할 수 있습니다.
1. try-catch로 SecurityException 처리하기
기존 코드를 그대로 사용할 경우 가장 간단한 방법으로 실행하고자 하는 소스코드 앞뒤로 try-catch Exception을 사용하는 방법입니다. 기존 코드를 완전히 뜯어고칠 필요 없이 try-catch를 추가하기 때문에 매우 간단합니다만 사용자가 Permission을 허가하지 않을 경우 이 코드를 실행하지 못하고 바로 Exception올 빠지게 됩니다.

2. checkSelfPermission()함수를 사용하여 권한여부 확인하기
사용하고자 하는 Permission을 처리하기 전 사용자가 권한을 허가하였는지 미리 파악한 후 소스코드를 실행하는 방식입니다. try-catch로 SecurityException을 처리하는 것보다 좀 더 디테일하게 권한 사용 여부를 확인하며 만약 권한이 허가되지 않았을 경우 if-else문을 통해 사용자에게 다시 한 번 Permission을 허가해줄지 확인할 수 있도록 코딩할 수 있습니다.

애플리케이션을 설치할 때 수두룩 나오는 Permission들이 어떤 부분에서 사용되는 지를 전혀 알길이 없어 바로 OK한 후 애플리케이션을 내려받아왔었는데 이번 6.0의 변화로 실행 도중에 어떤 상황에서 Permission이 사용되는지 좀 더 자세히 알 수 있어 쓸데없는 권한 사용을 남발하는 것을 줄일 수 있어 좋습니다. 다만, 이전처럼 한 번에 권한을 모두 갖는 것이 아니다 보니 실행 도중 Permission을 묻는 부분을 일일히 코딩해야 하는 것이 어렵다는건 아직까지는 적응이 되지 않습니다.
무쪼록 앞으로도 안드로이드는 기존보다는 좀 더 나은 방향으로 발전할 것이라 기대해봅니다.
'안드로이드 > 애플리케이션 제작' 카테고리의 다른 글
설정
트랙백
댓글
글
안드로이드 프레임워크 프로그래밍(28) [System Service의 proxy와 native의 Interface 상속 구조]
안드로이드 프레임워크를 공부하는 데 있어 다루게 되는 내용 중 가장 중요한 것을 꼽아본다면 각 프로세스간의 통신 방식인 Binder의 활용이 아닐까 생각합니다. 실제로 안드로이드 운영체제 내에서 동작하는 System Service가 Android 애플리케이션 프로세스 상호간에 통신하기 위해서는 IPC(Interprocess Communication)통신의 일종인 Binder 통신을 사용합니다. 안드로이드 운영체제 또한 리눅스를 기반으로 만들어졌으므로 프로세스의 구조 또한 리눅스의 그것과 비슷하다고 할 수 있습니다. 다만, 기존 리눅스에서 사용하는 IPC 뿐 아니라 RPC(Remote Process Communication)를 사용해 AIDL(Android Interface Definition Language)를 통해 좀 더 간단하게 프로세스간 통신을 할 수 있게 하고 있습니다.

위의 그램은 Application에서의 프로세스와 System Service에서의 프로세스가 Binder 드라이버를 통해 커널 상으로 통신하고 있는 모습을 그림으로 나타낸 것입니다. 본 포스팅에서는 위와 같은 Binder를 사용하기 위해 proxy와 native에서 Interface를 구성하는 과정에 대해 간단히 설명드리겠습니다. Android에서 proxy에 해당되는 프로세스는 앞부분에 bp를, native에 해당되는 프로세스는 bn을 붙여줍니다. 아마도 약자는 각각 binder proxy, binder native로 추정됩니다.
먼저 System Service중 하나인 CameraService를 예를 들어 설명해 보겠습니다. 실제로 CameraService는 System Service의 일부로서 이를 사용하기 위해서는 Interface로 구성된 ICameraService를 통해 Binder를 통한 프로세스 통신을 해야 합니다.
/frameworks/av/include/camera/ICameraService.h
1 2 3 4 5 6 7 8 9 10 11 12 | class ICameraService : public IInterface { public: .... virtual status_t connect(const sp<ICameraClient>& cameraClient, int cameraId, const String16& clientPackageName, int clientUid, /*out*/ sp<ICamera>& device) = 0; .... } | cs |
ICameraService 클래스는 IInterface 클래스를 상속받고 있으며 내부에는 virtual 함수 connect()가 있습니다. 차후 connect()함수는 ICameraService 클래스를 상속하는 클래스에서 정의될 것입니다.
/frameworks/native/include/binder/IInterface.h
1 2 3 4 5 6 7 8 9 10 11 | class IInterface : public virtual RefBase { public: IInterface(); static sp<IBinder> asBinder(const IInterface*); static sp<IBinder> asBinder(const sp<IInterface>&); protected: virtual ~IInterface(); virtual IBinder* onAsBinder() = 0; }; | cs |
IInterface 클래스가 RefBase 클래스를 상속받고
/frameworks/rs/cpp/util/RefBase.h
1 2 3 4 5 6 7 | class RefBase { public: ... } | cs |
RefBase 클래스는 안드로이드 native 단계에서의 framework 내에 있는 거의 대다수의 Class의 최상 부모입니다. 안드로이드에서는 이를 통해 각 클래스의 성질을 설정하고 있다고 생각해주시면 되겠습니다.
그렇다면 위에서 설명해드렸던 ICameraService를 상속받는 클래스는 어떤 것이 있을까요? Application 프로세스가 System Service 프로세스와 통신하기 위해서는 총 2가지의 클래스를 사용하게 됩니다. Application 프로세스에서는 BpCameraService 클래스를, System Service 프로세스에서는 BnCameraService를 통해 Application 프로세스에서 요구하는 명령을 수행하게 됩니다.
아래 소스코드는 ICameraService 클래스를 상속받는 BpCameraService의 모습을 나타냅니다.
/frameworks/av/camera/ICameraService.cpp
1 2 3 4 5 6 7 8 9 10 11 12 13 14 15 16 17 18 19 20 21 22 23 24 25 26 27 28 29 30 31 | class BpCameraService: public BpInterface<ICameraService> { public: BpCameraService(const sp<IBinder>& impl) : BpInterface<ICameraService>(impl) { } .... // connect to camera service (android.hardware.Camera) virtual status_t connect(const sp<ICameraClient>& cameraClient, int cameraId, const String16 &clientPackageName, int clientUid, /*out*/ sp<ICamera>& device) { Parcel data, reply; data.writeInterfaceToken(ICameraService::getInterfaceDescriptor()); data.writeStrongBinder(cameraClient->asBinder()); data.writeInt32(cameraId); data.writeString16(clientPackageName); data.writeInt32(clientUid); remote()->transact(BnCameraService::CONNECT, data, &reply); if (readExceptionCode(reply)) return -EPROTO; status_t status = reply.readInt32(); if (reply.readInt32() != 0) { device = interface_cast<ICamera>(reply.readStrongBinder()); } return status; } .... } | cs |
소스코드를 보시면 아시듯이 BpCameraService는 BpInterface 클래스를 수식하는데 BpInterface 클래스는 ICameraService 클래스를 template로 설정하고 있는 것을 볼 수 있습니다. 그렇다면 BpInterface는 어떻게 생겼을까요?
/frameworks/native/include/binder/IInterface.h
1 2 3 4 5 6 7 8 9 10 | template<typename INTERFACE> class BpInterface : public INTERFACE, public BpRefBase { public: BpInterface(const sp<IBinder>& remote); protected: virtual IBinder* onAsBinder(); }; | cs |
/frameworks/native/include/binder/Binder.h
1 2 3 4 5 6 7 8 9 10 11 12 13 14 15 16 17 18 19 20 | class BpRefBase : public virtual RefBase { protected: BpRefBase(const sp<IBinder>& o); virtual ~BpRefBase(); virtual void onFirstRef(); virtual void onLastStrongRef(const void* id); virtual bool onIncStrongAttempted(uint32_t flags, const void* id); inline IBinder* remote() { return mRemote; } inline IBinder* remote() const { return mRemote; } private: BpRefBase(const BpRefBase& o); BpRefBase& operator=(const BpRefBase& o); IBinder* const mRemote; RefBase::weakref_type* mRefs; volatile int32_t mState; }; | cs |
BpRefBase 클래스 또한 RefBase를 상속받고 있습니다. 결과적으로 BpCameraService는 RefBase를 다이아몬드 상속으로 두 번 이상 상속받고 있는 것입니다. 그 때문인지 RefBase는 virtual 클래스로 상속받는 것으로 이해할 수 있습니다.
위에서 설명한 소스코드의 상속 구조도를 이미지로 표현하면 다음과 같습니다. native에서의 상속 구조도 나타내 보았으니 여러분들께서 BnCameraService를 직접 확인해보시면 원리를 파악하는데 큰 도움이 되실 겁니다. :)

'안드로이드 > 프레임워크' 카테고리의 다른 글
| 안드로이드 프레임워크 프로그래밍(27) [Fedora에서 AOSP 안드로이드 운영체제 컴파일하기] (0) | 2015.12.31 |
|---|---|
| Windows 환경에서 fastboot를 통해 Android 이미지 포팅(Fastboot in Windows 7) (3) | 2015.11.22 |
| 안드로이드 프레임워크 프로그래밍(26) [System Service에서 Activity 함수 호출하기] (0) | 2015.10.27 |
| Android에서 VSync 동작 원리 및 초기화 과정(5) (0) | 2015.09.20 |
| 안드로이드 프레임워크 프로그래밍(25) [Native 단계에서 Looper의 동작 원리] (0) | 2015.09.16 |
설정
트랙백
댓글
글
안드로이드 프레임워크 프로그래밍(27) [Fedora에서 AOSP 안드로이드 운영체제 컴파일하기]
일반적으로 안드로이드 운영체제를 Build 할 때 거의 대부분의 경우 Ubuntu 환경에서 수행됩니다. AOSP 공식 홈페이지에서도 Ubuntu를 권장하고 있는 바이기도 합니다.
그래도 혹여나 하는 마음에 Fedora 운영체제에서 안드로이드를 Build 해보는 과정에 대해 포스팅을 해보고자 합니다. 같은 RPM 패키지를 사용하는 Redhat이나 OpenSUSE에서도 이 포스팅의 내용을 적용할 수 있으리라 생각합니다.
Build Version : Android 6.0.1(Marshmellow)
OS : Fedora 23 (Twenty Three) 64-bit
JDK Version : OpenJDK 1.7.0
1. 빌드하고자 하는 AOSP 소스코드를 다운로드 받습니다. 관련 내용에 대해 자세히 알아보고자 하시는 분은 아래 포스팅을 참조해 주기길 바랍니다.
$ mkdir ~/bin
$ export PATH=$PATH:~/bin
$ curl https://storage.googleapis.com/git-repo-downloads/repo > ~/bin/repo
$ chmod a+x ~/bin/reop
$ mkdir ~/aosp
$ cd ~/aosp
$ repo init -u https://android.googlesource.com/platform/manifest -b android-6.0.1_r1
$ repo sync -j4
위 과정까지 마치셨다면 아래와 같이 aosp 폴더에 소스코드 다운로드 된 것을 확인하실 수 있습니다.

2. 다운로드한 안드로이드 소스코드를 컴파일할 수 있는 환경을 설정합니다. Marshmellow(6.0) 버전의 경우 OpenJDK 1.7.0을 설치해야 합니다. Oracle JDK로 컴파일을 시도하려 해도 시작하기 전에 컴파일이 중단되어버립니다. Fedora의 경우 dnf를 통해서는 최신 버전의 자바만 지원해주기 때문에 사용자가 직접 OpenJDK를 설치해야 합니다. 설치 방법은 아래의 포스팅을 참조해 주시기 바랍니다.
Fedora에 이전 버전의 OpenJDK 설치하기(Install OpenJDK 7 in Fedora 23)
만약 설치한 이후에도 해당 버전이 적용되어 있지 않았을 경우 아래의 명령어를 통해 직접 설치해줍시다.
# alternatives --install /usr/bin/java java /usr/lib/jvm/java-1.7.0-openjdk/bin/java 1
# alternatives --install /usr/bin/javac javac /usr/lib/jvm/java-1.7.0-openjdk/bin/javac 1
# alternatives --install /usr/bin/javadoc javadoc /usr/lib/jvm/java-1.7.0-openjdk/bin/javadoc 1
3. dnf를 통해 안드로이드를 빌드하기 위해 필요한 패키지를 설치합니다.
# dnf install bison gcc xorg-x11-fonts-Type1 libpng15
4. 이제 다운로드 받은 소스코드를 build 하기 위한 준비과정을 진행해 보도록 하겠습니다. 먼저 build 환경을 초기화합니다.
$ ~/aosp
$ source build/envsetup.sh
$ lunch
안드로이드 6.0.1 버전 기준으로 build 환경은 다음과 같이 나타납니다.

여기서 자신이 build 하고자 하는 환경을 선택합니다. 본 포스팅의 경우 Android Studio를 통한 에뮬레이터에서의 실행을 목표로 함으로 1번 혹은 14번을 선택합니다. 혹시 자신이 build 하고자 하는 환경에 대한 설정을 알고 싶으신 분은 아래의 포스팅을 참조해 주시기 바랍니다.
안드로이드 프레임워크 프로그래밍(3) [NEXUS5에 소스 빌드하기]
5. 이제 build를 해보도록 합니다.
$ make update-api && make -j4
아래와 같은 결과가 나왔다면 Fedora 운영체제 환경에서 안드로이드 이미지를 빌드하는 데에 성공한 겁니다!

'안드로이드 > 프레임워크' 카테고리의 다른 글
| 안드로이드 프레임워크 프로그래밍(28) [System Service의 proxy와 native의 Interface 상속 구조] (0) | 2016.03.03 |
|---|---|
| Windows 환경에서 fastboot를 통해 Android 이미지 포팅(Fastboot in Windows 7) (3) | 2015.11.22 |
| 안드로이드 프레임워크 프로그래밍(26) [System Service에서 Activity 함수 호출하기] (0) | 2015.10.27 |
| Android에서 VSync 동작 원리 및 초기화 과정(5) (0) | 2015.09.20 |
| 안드로이드 프레임워크 프로그래밍(25) [Native 단계에서 Looper의 동작 원리] (0) | 2015.09.16 |
설정
트랙백
댓글
글
Fedora에서 Android Studio가 동작되지 않을 때[Unable to run mksdcard SDK tool]
Fedora 23 버전에서 Android Studio를 설치해야 될 일이 있어 한 번 해보려는데 생소한 오류가 발생하였습니다.
Unable to run mksdcard SDK tool.

이 경우 아래와 같은 명령어를 수행하여 설치해줍니다.
#dnf install compat-libstdc++-296.i686 compat-libstdc++-33.i686 compat-libstdc++-33.x86_64 ncurses-libs.i686
설치후 안드로이드 스튜디오를 다시 실행하시면 정상적으로 동작되는 것을 확인하실 수 있습니다.
$ ~/android-studio/bin/studio.sh

'안드로이드 > 애플리케이션 제작' 카테고리의 다른 글
설정
트랙백
댓글
글
Windows 환경에서 fastboot를 통해 Android 이미지 포팅(Fastboot in Windows 7)
Linux 환경에서 안드로이드 운영체제를 컴파일 하다 보니 안드로이드 이미지 포팅을 Linux로만 하게 되다보니 Windows 환경에서는 어떻게 하면 되는지 궁금했었는데 마침 기회가 되어 포스팅을 하게 되었습니다. 이번 포스팅에서는 Windows 환경에서 안드로이드 커널 이미지를 fastboot를 통해 설치해 보도록 합니다.
안드로이드 기기 : LG NEXUS 5
빌드 버전 : KitKat 4.4.4(r2)
운영체제 : Windows 7 SP1
포스팅을 시작하기에 앞서 안드로이드 운영체제를 컴파일하여 이미지를 얻어내는 과정은 이전에 설명드렸던 포스팅을 참조해 주시길 바랍니다.
안드로이드 프레임워크 프로그래밍(3) [NEXUS5에 소스 빌드하기]
1. 컴파일을 통해 완셩된 안드로이드 운영체제 이미지를 얻어냅니다. 이는 아래의 경로에서 얻으실 수 있습니다.
~/kitkat/out/target/product/hammerhead/

위에서 확인하실 수 있는 이미지(img) 파일 5개와 android-info.txt를 가져옵니다.
2. Windows 환경에서 Android SDK가 설치되어 있어야 합니다. Android SDK Manager를 실행하여 최하단 메뉴에 있는 Google USB Driver를 설치합니다.

3. 환경번수를 설정해줍니다. 컴퓨터에서 마우스 우측 클릭후 '속성'을 클릭합니다.

4. '고급 시스템 설정'을 클릭합니다.

5. 시스템 속성에서 '고급' 탭을 선택한 후 '환경 변수'를 클릭합니다.

6. 환경변수 창에서 시스템변수(S) 내에 Path를 더블클릭합니다.

7. 변수 값의 뒷부분에 다음 값을 추가합니다.
C:\Program Files\Android\android-sdk\platform-tools;
※주의!!
절대로 변수 값의 내용을 지우시면 안됩니다! 만약 실수로 변수 값을 덮어쓰셨다면 바로 취소 버튼을 누릅니다. 만약 기존의 환경변수를 덮어쓰기로 모두 삭제할 경우 연결된 프로그램들이 동작을 하지 못하게 되는 참사가 발생합니다!
만약 실수로 덮어쓰기 후 확인 버튼을 눌러 변수가 지워지신 분들은 절대로 당황하지 마시고 제가 이전에 포스팅한 내용을 따라가며 원래 환경 변수값을 복구하시길 바랍니다.
[윈도7] 환경변수 path 삭제시 복구하는 방법 ← 클릭하시면 새창으로 이동합니다.
========================================================================================================
8. 이번에는 안드로이드 운영체제 이미지가 위치하는 경로를 설정합니다. 아래 화면에서 '새로 만들기(W)'를 클릭합니다.

9. 새 시스템 변수의 변수 이름은 'ANDROID_PRODUCT_OUT'로, 변수 값은 안드로이드 커널 이미지가 위치한 파일 경로를 입력합니다. 본 포스팅에서는 E:\ 디스크에 안드로이드 커널 이미지를 두었습니다.

10. 이로서 Windows 환경에서 안드로이드 기기에 운영체제 이미지를 포팅할 준비를 마쳤습니다. 자신의 기기를 Fastboot 모드로 설정한 후 USB로 연결합니다.

11. Windows 운영체제가 안드로이드의 Fastboot 상태를 인식하게 되면 '드라이버 소프트웨어 설치'를 진행합니다. 아래와 같이 'Andorid Bootloader Interface'가 사용 준비 완료가 되기를 기다립니다.

12. CMD 창을 열어 다음과 같이 입력합니다.
> fastboot flashall

위와 같은 화면이 나온다면 여러분들은 Windows 환경에서 fastboot를 통한 이미지 설치를 완료한 것입니다!
'안드로이드 > 프레임워크' 카테고리의 다른 글
| 안드로이드 프레임워크 프로그래밍(28) [System Service의 proxy와 native의 Interface 상속 구조] (0) | 2016.03.03 |
|---|---|
| 안드로이드 프레임워크 프로그래밍(27) [Fedora에서 AOSP 안드로이드 운영체제 컴파일하기] (0) | 2015.12.31 |
| 안드로이드 프레임워크 프로그래밍(26) [System Service에서 Activity 함수 호출하기] (0) | 2015.10.27 |
| Android에서 VSync 동작 원리 및 초기화 과정(5) (0) | 2015.09.20 |
| 안드로이드 프레임워크 프로그래밍(25) [Native 단계에서 Looper의 동작 원리] (0) | 2015.09.16 |
설정
트랙백
댓글
글
Android Studio로 improt 한 후 컴파일 타겟 변경하기(failed to find target with hash string ...)
최근 안드로이드 스튜디오로 건너온 이래로 차근차근 Eclipse에서 사용하던 project 들을 옮기고 있습니다. 그러던 중 몇몇 프로젝트의 경우 아래와 같은 에러가 발생하더군요.
Error : Cause : failed to find target with hash string 'android-15'
이는 기존에 Eclipse 에서 사용하던 프로젝트가 Android Studio로 건너왔을 때 해당 버전에서 설정한 컴파일 sdk 버전이 없을 경우 위와 같은 에러가 발생합니다.

해결 방법으로는 2가지의 경우가 있습니다.
1. 해당 Target에 해당하는 안드로이드 버전을 SDK Manager를 실행하여 다운로드 받는다.
2. 컴파일 버전을 자신의 SDK Manager가 가지고 있는 버전으로 변경합니다. 변경 방법은 아래와 같습니다.
자신의 프로젝트 폴더 -> app -> build.gradle
해당 Gradle에서 compileSdkVersion을 변경해주면 프로젝트가 정상적으로 동작됨을 확인하실 수 있습니다.

'안드로이드 > 애플리케이션 제작' 카테고리의 다른 글
| 안드로이드 6.0에서 SecurityException 처리방법(Call requires permission which may be rejected by user....) (0) | 2016.08.09 |
|---|---|
| Fedora에서 Android Studio가 동작되지 않을 때[Unable to run mksdcard SDK tool] (0) | 2015.12.21 |
| 안드로이드 - Java 서버간 Object 객체 소켓 프로그래밍 (8) | 2015.10.29 |
| Linux(우분투)에서 Android Studio 빠르게 실행하는 방법(바로가기 추가하기) (0) | 2015.10.17 |
| 같은 공유기에 접속중인 안드로이드 기기 탐색 및 통신하기 (0) | 2015.10.16 |
설정
트랙백
댓글
글
안드로이드 - Java 서버간 Object 객체 소켓 프로그래밍
Java를 기반으로 한 프로그래밍을 하다 보면 자신이 만든 Class 단위의 값을 전송하고 싶은 경우가 있습니다. 만약 서버가 C/C++ 기반으로 만들어진 경우 호환을 위해 Class 내의 값을 기본형인 int나 String으로 변환한 후 이를 Byte 값으로 변환하여 전송을 한 후 이 값을 받은 서버가 다시 C/C++에서 가공하기 편한 구조로 다시 변경하는 방식을 사용해야 되어서 프로그래밍을 할 때 다소 불편한 점이 있습니다.
만약 서버가 Java를 기반으로 한다면 프로그래밍의 방식이 약간은 쉽게 바꿀 수 있습니다. 안드로이드와 서버 모두 Java를 사용하므로 Class를 통째로 넘겨주어도 이를 그대로 사용할 수 있다는 것입니다. 이 기능을 구현해주는 것이 바로 이번 포스팅에서 다루게 될 ObjectInputStream과 ObjectOutputStream 입니다. 바로 예제를 통해 이를 수행해보도록 합니다.
먼저 Java 언어로 서버를 설계해보도록 합니다.
1 2 3 4 5 6 7 8 9 10 11 12 13 14 15 16 17 18 19 20 21 22 23 24 25 26 27 28 29 30 31 32 33 34 35 36 37 38 39 40 41 42 43 44 | import java.io.IOException; import java.io.InputStream; import java.io.ObjectInputStream; import java.io.ObjectOutputStream; import java.io.OutputStream; import java.net.ServerSocket; import java.net.Socket; public class Server { public static void main(String[] args) { // TODO Auto-generated method stub try { int port = 8200; //서버에 사용할 포트 번호를 설정해줍니다. ServerSocket sock = new ServerSocket(port); //안드로이드 Client로부터 접속을 받을 준비를 합니다. Socket socket = sock.accept(); //Socket로부터 받게 되는 InputStream을 설정합니다. InputStream is = socket.getInputStream(); //InputStream의 최종 형식을 Object로 설정해줍니다. ObjectInputStream ois = new ObjectInputStream(is); //Socket로부터 받은 데이터를 Object로 수신합니다. String getString = (String)ois.readObject(); System.out.println("receive : " + getString); ois.close(); is.close(); socket.close(); sock.close(); } catch (IOException e) { // TODO Auto-generated catch block e.printStackTrace(); } catch (ClassNotFoundException e) { // TODO Auto-generated catch block e.printStackTrace(); } } } | cs |
다음으로 안드로이드에서 Java 서버로 Object를 전송할 수 있는 프로그램을 만들어봅니다.
activity_main.xml
1 2 3 4 5 6 7 8 9 10 11 12 13 14 15 16 17 18 19 20 21 22 23 24 25 26 27 28 29 30 31 32 33 34 35 36 37 38 39 40 41 42 43 44 45 46 47 48 49 50 51 52 53 54 55 56 57 58 59 60 61 62 63 64 65 66 67 68 69 70 71 72 73 74 75 76 77 78 79 80 81 | <?xml version="1.0" encoding="utf-8"?> <LinearLayout xmlns:android="http://schemas.android.com/apk/res/android" xmlns:tools="http://schemas.android.com/tools" android:id="@+id/activitymain" android:layout_width="match_parent" android:layout_height="match_parent" android:orientation="vertical" android:gravity="center_horizontal" > <LinearLayout android:layout_width="match_parent" android:layout_height="wrap_content" android:orientation="horizontal" > <TextView android:layout_width="90dp" android:layout_height="wrap_content" android:text="IP주소" /> <EditText android:id="@+id/ipaddr" android:layout_width="match_parent" android:layout_height="wrap_content" android:text="192.168.1.1" /> </LinearLayout> <LinearLayout android:layout_width="match_parent" android:layout_height="wrap_content" android:orientation="horizontal" > <TextView android:layout_width="90dp" android:layout_height="wrap_content" android:text="PORT 번호" /> <EditText android:id="@+id/portnumber" android:layout_width="match_parent" android:layout_height="wrap_content" android:text="8200" /> </LinearLayout> <LinearLayout android:layout_width="match_parent" android:layout_height="wrap_content" android:orientation="horizontal" > <TextView android:layout_width="90dp" android:layout_height="wrap_content" android:text="보낼 내용" /> <EditText android:id="@+id/sendserv" android:layout_width="match_parent" android:layout_height="wrap_content" android:text="시스템프로그램설계" /> </LinearLayout> <Button android:id="@+id/tryconnect" android:layout_width="wrap_content" android:layout_height="wrap_content" android:text="connect!" android:onClick="OnClick" /> </LinearLayout> | cs |
MainActivity.java
1 2 3 4 5 6 7 8 9 10 11 12 13 14 15 16 17 18 19 20 21 22 23 24 25 26 27 28 29 30 31 32 33 34 35 36 37 38 39 40 41 42 43 44 45 46 47 48 49 50 51 52 53 54 55 56 57 58 59 60 61 62 63 64 65 66 67 68 69 70 71 72 73 74 75 76 77 78 | import java.io.ObjectOutputStream; import java.io.OutputStream; import java.net.Socket; import android.app.Activity; import android.os.Bundle; import android.os.Handler; import android.view.View; import android.widget.EditText; import android.widget.Toast; public class MainActivity extends Activity{ private Handler mHandler = new Handler(); private EditText ipaddr, portno, message; protected void onCreate(Bundle savedInstanceState){ super.onCreate(savedInstanceState); setContentView(R.layout.activity_main); ipaddr = (EditText)findViewById(R.id.ipaddr); portno = (EditText)findViewById(R.id.portnumber); message = (EditText)findViewById(R.id.sendserv); } public void OnClick(View v) throws Exception{ switch(v.getId()){ case R.id.tryconnect: (new Connect()).start(); break; } } class Connect extends Thread { public void run() { String ip = ipaddr.getText().toString(); int port = Integer.parseInt(portno.getText().toString()); String output = message.getText().toString(); try { //서버에 접속합니다. Socket socket = new Socket(ip, port); //소켓으로부터 OutputStream을 설정합니다. OutputStream os = socket.getOutputStream(); //OutputStream을 Object 방식으로 전송하도록 설정합니다. ObjectOutputStream oos = new ObjectOutputStream(os); //Object를 Socket을 통해 값을 전송합니다. oos.writeObject(output); oos.close(); os.close(); socket.close(); } catch (Exception e) { // TODO Auto-generated catch block final String recvInput = "연결에 실패하였습니다."; mHandler.post(new Runnable() { @Override public void run() { // TODO Auto-generated method stub setToast(recvInput); } }); } } } void setToast(String msg) { Toast.makeText(this, msg, Toast.LENGTH_SHORT).show(); } } | cs |
결과는 아래와 같습니다.
Client(안드로이드)측

Server측

'안드로이드 > 애플리케이션 제작' 카테고리의 다른 글
| Fedora에서 Android Studio가 동작되지 않을 때[Unable to run mksdcard SDK tool] (0) | 2015.12.21 |
|---|---|
| Android Studio로 improt 한 후 컴파일 타겟 변경하기(failed to find target with hash string ...) (0) | 2015.11.06 |
| Linux(우분투)에서 Android Studio 빠르게 실행하는 방법(바로가기 추가하기) (0) | 2015.10.17 |
| 같은 공유기에 접속중인 안드로이드 기기 탐색 및 통신하기 (0) | 2015.10.16 |
| Error: The SDK Build Tools revision is too low for project (0) | 2015.10.10 |
설정
트랙백
댓글
글
안드로이드 프레임워크 프로그래밍(26) [System Service에서 Activity 함수 호출하기]
안드로이드 AIDL을 사용하여 RPC통신을 통해 Application 단계에서 Framework 단계의 method를 호출하는 방법에 대해 알아본 바 있습니다. 이번 포스팅에서는 Framework 단계에서 Application의 Activity에 존재하는 method를 호출하는 방법에 대해 알아보도록 하겠습니다.
포스팅을 시작하기에 앞서 이전에 사용하였던 Application 단계에서 Framework 단계의 기능을 사용한 바 있습니다. 이에 대한 자세한 내용은 아래 포스팅을 참조해주시길 바랍니다. 또한 본 포스팅의 예제 또한 아래 포스팅의 것을 사용하였음을 알립니다.
안드로이드 프레임워크 프로그래밍(4) [시스템서비스 추가하기]
안드로이드 Application을 실행하였을 때 Framework 단계에서 실행하고자 하는 method를 onCreate() 단계에서 등록을 합니다. 그 이후 System Service에서 특정 부분을 호출 받았을 때 Application의 Activity 내에 있는 함수를 실행하는 과정을 구현할 것입니다.
1. AIDL을 통해 Callback 함수 등록 및 해제 함수를 만들어줍니다.
/frameworks/base/core/java/android/os/ITestService.aidl
1 2 3 4 5 6 7 8 9 10 11 12 13 14 15 16 17 18 19 20 21 22 23 24 25 26 27 28 | /* * aidl file : frameworks/base/core/java/android/os/ITestService.aidl * This file contains definitions of functions which are exposed by service */ package android.os; import android.os.IActivityServiceCallback; interface ITestService { /** * {@hide} */ void setValue(int val); void execCallback(int val); /** * Often you want to allow a service to call back to its clients. * This shows how to do so, by registering a callback interface with * the service. */ boolean registerCallback(IActivityServiceCallback cb); /** * Remove a previously registered callback interface. */ boolean unregisterCallback(IActivityServiceCallback cb); } | cs |
Activity에서 실행하고자 하는 method는 registerCallback() method를 통해 System Service에 등록할 수 있습니다. execCallback()함수는 이후 Application에서 RPC를 통해 호출을 받은 후 Callback 기능을 구현하기 위해 만든 함수입니다.
2. Activity로부터 호출하고자 하는 함수를 구현할 IActivityServiceCallback.aidl을 생성합니다.
/frameworks/base/core/java/android/os/IActivityServiceCallback.aidl
1 2 3 4 5 6 7 8 9 10 11 12 13 | package android.os; /** * Example of a callback interface used by IActivityService to send * synchronous notifications back to its clients. Note that this is a * one-way interface so the server does not block waiting for the client. */ oneway interface IActivityServiceCallback { /** * Called when the service has a new value for you. */ void callActivityMethod(int value); } | cs |
위의 과정에서 만들어진 callActivityMethod() method는 이후 Activity에서 Callback 방식으로 구현될 것입니다. 다음으로 System Serivce에서 위의 새로 생성한 함수들을 구현해 보도록 하겠습니다.
/frameworks/base/services/java/com/android/server/TestService.java
1 2 3 4 5 6 7 8 9 10 11 12 13 14 15 16 17 18 19 20 21 22 23 24 25 26 27 28 29 30 31 32 33 34 35 36 37 38 39 40 41 42 43 44 45 46 47 48 49 50 51 52 53 54 55 56 57 58 59 60 61 62 63 64 65 66 67 68 69 70 71 72 73 74 75 76 77 78 79 80 81 82 83 84 85 86 87 88 89 90 91 92 93 94 95 96 97 98 99 100 101 102 | /*TestService.java */ package com.android.server; import android.content.Context; import android.os.Handler; import android.os.IActivityServiceCallback; import android.os.ITestService; import android.os.Looper; import android.os.Message; import android.os.Process; import android.os.RemoteCallbackList; import android.os.RemoteException; import android.util.Log; public class TestService extends ITestService.Stub { private static final String TAG = "TestService"; private TestWorkerThread mWorker; private TestWorkerHandler mHandler; private Context mContext; RemoteCallbackList<IActivityServiceCallback> callbacks = new RemoteCallbackList<IActivityServiceCallback>(); public TestService(Context context) { super(); mContext = context; mWorker = new TestWorkerThread("TestServiceWorker"); mWorker.start(); Log.i(TAG, "Spawned worker thread"); } public boolean registerCallback(IActivityServiceCallback cb) throws RemoteException{ boolean flag = false; if(cb != null){ flag = callbacks.register(cb); } return flag; } public boolean unregisterCallback(IActivityServiceCallback cb) throws RemoteException{ boolean flag = false; if(cb != null){ flag = callbacks.unregister(cb); } return flag; } public void setValue(int val) { Log.i(TAG, "setValue " + val); Message msg = Message.obtain(); msg.what = TestWorkerHandler.MESSAGE_SET; msg.arg1 = val; mHandler.sendMessage(msg); } public void execCallback(int val){ Message msg = Message.obtain(); msg.what = TestWorkerHandler.CALLBACK; msg.arg1 = val; mHandler.sendMessage(msg); } private class TestWorkerThread extends Thread { public TestWorkerThread(String name) { super(name); } public void run() { Looper.prepare(); mHandler = new TestWorkerHandler(); Looper.loop(); } } private class TestWorkerHandler extends Handler { private static final int MESSAGE_SET = 0; private static final int CALLBACK = 1; @Override public void handleMessage(Message msg) { try { if (msg.what == MESSAGE_SET) { Log.i(TAG, "set message received: " + msg.arg1); } if (msg.what == CALLBACK) { int n = callbacks.beginBroadcast(); for(int i = 0; i < n ; i++){ try { Log.i(TAG, "callbacks.beginBroadcast()"); callbacks.getBroadcastItem(i).callActivityMethod(msg.arg1); } catch (RemoteException e) { e.printStackTrace(); } } callbacks.finishBroadcast(); } } catch (Exception e) { // Log, don't crash! Log.e(TAG, "Exception in TestWorkerHandler.handleMessage:", e); } } } } | cs |
RemoteCallbackList 클래스를 통해 Activity로부터 callback을 등록한 후 execCallback() method가 Application으로부터 호출되면 곧 System Service에서 등록한 callback을 실행하게 됩니다. 아래는 이를 구현한 Application 소스코드입니다.
1 2 3 4 5 6 7 8 9 10 11 12 13 14 15 16 17 18 19 20 21 22 23 24 25 26 27 28 29 30 31 32 33 34 35 36 37 38 39 40 41 42 43 44 45 46 47 48 49 50 51 52 53 54 55 56 57 58 59 60 61 62 63 64 65 66 67 68 69 70 71 72 73 74 75 76 77 78 79 | package com.example.test; import android.app.Activity; import android.content.Intent; import android.os.Bundle; import android.os.IActivityServiceCallback; import android.os.ITestService; import android.os.RemoteException; import android.os.ServiceManager; import android.view.Menu; import android.view.MenuItem; import android.view.View; import android.widget.TextView; import android.util.Log; public class MainActivity extends Activity { private static final String DTAG = "HelloServer"; ITestService om; IActivityServiceCallback mCallback = new IActivityServiceCallback.Stub() { @Override public void callActivityMethod(int arg0) throws RemoteException { // TODO Auto-generated method stub final int value = arg0; mHandler.post(new Runnable() { @Override public void run() { // TODO Auto-generated method stub setToast("callActivityMethod : " + value); } }); } }; @Override protected void onCreate(Bundle savedInstanceState) { super.onCreate(savedInstanceState); setContentView(R.layout.activity_main); om = ITestService.Stub.asInterface(ServiceManager.getService("Test")); try{ Log.d(DTAG, "Going to call service"); om.setValue(20); om.registerCallback(mCallback); Log.d(DTAG, "Service called successfully"); }catch(Exception e){ Log.d(DTAG, "FAILED to call service"); e.printStackTrace(); } } public void OnClick(View v) throws RemoteException{ switch(v.getId()){ case R.id.button1: om.execCallback(100); break; } } void setToast(String msg) { Toast.makeText(this, msg, Toast.LENGTH_SHORT).show(); } protected void onDestroy(){ super.onDestroy(); try { om.unregisterCallback(mCallback); } catch (RemoteException e) { // TODO Auto-generated catch block e.printStackTrace(); } } } | cs |
위 함수를 실행하면 다음과 같은 결과를 얻으실 수 있습니다.

'안드로이드 > 프레임워크' 카테고리의 다른 글
| 안드로이드 프레임워크 프로그래밍(27) [Fedora에서 AOSP 안드로이드 운영체제 컴파일하기] (0) | 2015.12.31 |
|---|---|
| Windows 환경에서 fastboot를 통해 Android 이미지 포팅(Fastboot in Windows 7) (3) | 2015.11.22 |
| Android에서 VSync 동작 원리 및 초기화 과정(5) (0) | 2015.09.20 |
| 안드로이드 프레임워크 프로그래밍(25) [Native 단계에서 Looper의 동작 원리] (0) | 2015.09.16 |
| SurfaceFlinger에서 DispSyncSource의 초기화 과정 (0) | 2015.09.12 |
