검색결과 리스트
글
Ubuntu에서 Youtube 동영상 PIP모드에서 다른 창에 의해 화면이 가려질 때 해결방법
공대생의 팁
2025. 10. 28. 15:12
지난 2025년 10월 15일부로 Windows 10 공식 지원이 완전 종료됨에 따라 사용하던 PC의 운영체제를 바꾸어야 하는 상황이 되었습니다. 안타깝게도 제가 사용중인 PC의 성능이 Windows 11 최소 사양을 충족하지 못해 우여곡절 끝에 멀티부트로 Ubuntu를 설치하고, 불가피한 상황에는 Windows 10을 사용하기로 했습니다.
학생 시절 개발자 짬이 어디 안가서 Ubuntu를 설치하자마자 내가 원하는 환경에 맞추어 프로그램 및 라이브러리를 추가로 설치했습니다. 인터넷 브라우저도 기본 제공되는 FireFox 대신 Google Chrome을 설치해 사용하기로 했습니다.
그런데 이러한 과정에서 생각지도 못한 상황이 발생하였습니다. 저는 평소에 Windows에서 Youtube 영상을 보면서 다른 작업을 하고 싶을 때 저는 PIP(Picture in Picture)모드로 동영상을 모니터의 구석에 띄어두고 작업을 했었습니다.

Chrome 우상단의 동영상 제어 버튼 클릭 후 해당 유튜브 동영상의 'PIP 모드 시작' 버튼을 클릭 한 다음
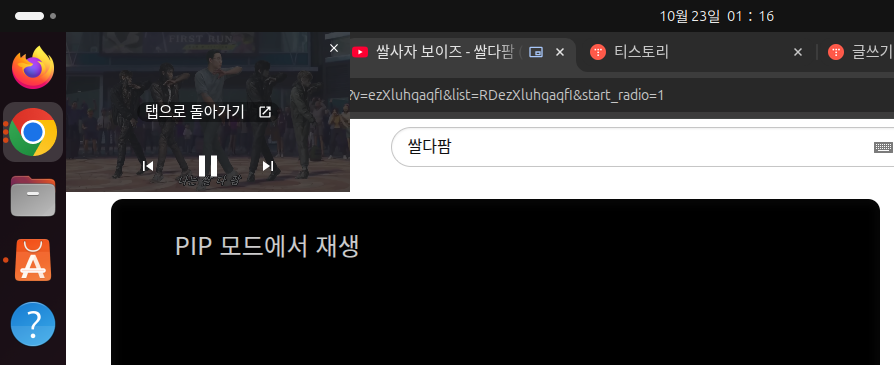
동영상이 별도의 창으로 분리되었을 때 Chrome의 다른 탭을 눌렀더니

놀랍게도 PIP모드로 띄어두었던 동영상이 난데 없이 사라져버렸습니다. 동영상의 사운드는 끊기지 않고 재생되는 것으로 보아 Ubuntu에서의 설정 문제로 보였고, 원인 해결을 위해 GPT에게 질문을 해보았습니다.
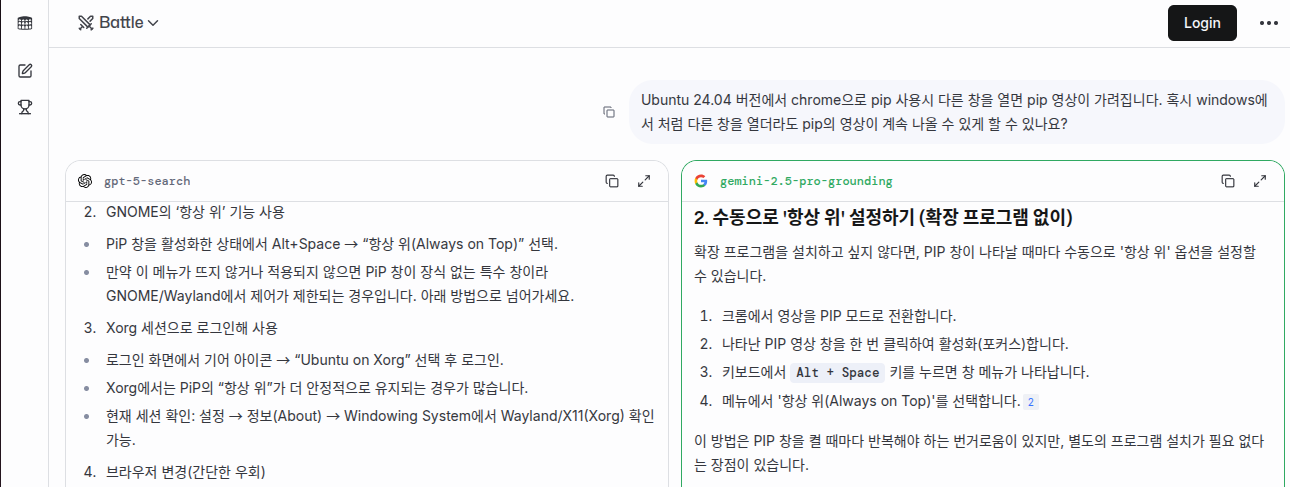
결과를 확인해보니 Linux 버전의 Chrome에서는 PIP모드 실행시 동영상 창의 설정이 '항상 위'로 되어 있지 않은 모양입니다.
GPT가 설명한 대로 PIP 모드로 동영상 창을 띄운 다음 Alt + Space 키를 누르니 아래와 같은 메뉴가 나타났습니다.
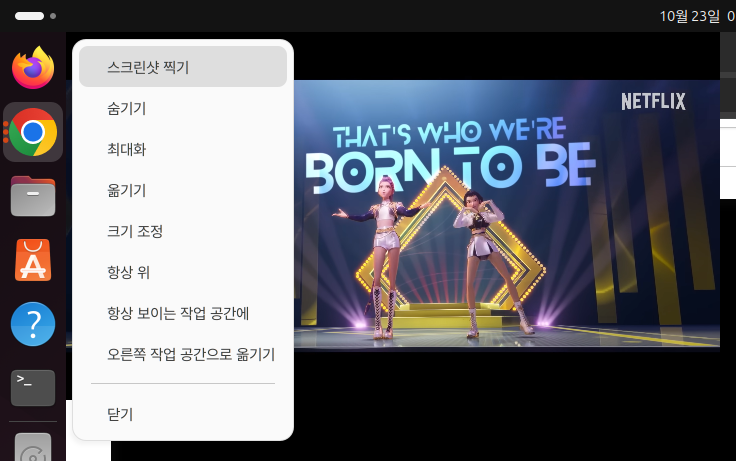
해당 메뉴에서 '항상 위'를 클릭한 다음 다른 탭을 열어보니

성공적으로 PIP 동영상 창이 사라지지 않고 항상 떠잇는 것을 확인하였습니다.
300x250
'공대생의 팁' 카테고리의 다른 글
| 티스토리에서 카카오 로그인시 튀어나오는 팝업 광고 삭제 방법 (0) | 2025.05.20 |
|---|---|
| Huggingface에서 데이터셋 다운로드가 계속 끊길때 해결방법 (0) | 2025.01.14 |
| Flask 라이브러리로 이미지를 업로드하고 볼 수 있는 서버 구축하기 (0) | 2024.10.26 |
| Windows Powershell에서 python 실행시 환경변수 설정 방법 (0) | 2024.05.28 |
| [mmcv] AssertionError: only one of size and size_divisor should be valid (0) | 2024.03.31 |
설정
트랙백
댓글
글
TensorRT 10버전 이후 변환된 모델을 C++에서 Inference 수행 방법(enqueueV3 함수 사용법)
프로그래밍 팁
2025. 9. 5. 01:01

※본 글을 작성했던 2025년 8월 당시 TensorRT 코드 작성을 GPT 4o에가 요청시 TensorRT 8버전을 기준으로 C++에서 Inference 수행시 'enqueueV2'를 사용하는 것으로만 코드 작성을 해줘서 온갖 고난 끝에 참고자료 페이지의 자료를 찾아내 enqueueV3() 함수 사용 방법을 작성하였습니다. 그런데 GPT5가 2024년 10월 1일까지의 자료를 학습하게 됨으로서 지금은 TensorRT 10 버전 기준으로 enqueueV3 함수를 잘 작성해줍니다.
TensorRT 10 버전이 등장하면서 변환된 모델을 C++에서 Inference 수행시 enqueueV3() 함수를 사용하여야 하며, 기존 8버전에서 사용했던 enqueueV2() 함수를 더이상 사용되지 않게 되었습니다. TensorRT 버전 변경에 따라 코드 변경 사항이 많아져 방법을 찾다가 아래 링크의 참고자료의 내용대로 코드를 작성하니 TensorRT 10 기준으로 변환된 AI모델이 잘 동작하는 것을 확인할 수 있었습니다.
아래의 소스코드는 퍼플렉시티AI의 도움으로 소스코드 설명을 주석으로 작성하였습니다. 아래의 흐름대로 코드를 작성하시면 TensorRT 10버전 이후 enqueueV3() 함수를 작성하는데 큰 어려움은 없을 것입니다.
|
1
2
3
4
5
6
7
8
9
10
11
12
13
14
15
16
17
18
19
20
21
22
23
24
25
26
27
28
29
30
31
32
33
34
35
36
37
38
39
40
41
42
43
44
45
46
47
48
49
50
51
52
53
54
55
56
57
58
59
60
61
62
63
64
65
66
67
68
69
70
71
72
73
74
75
76
77
78
79
80
81
82
83
84
85
86
87
88
89
90
91
92
93
94
95
96
97
98
99
100
101
102
103
104
105
106
107
108
109
110
111
112
113
114
115
116
117
118
119
120
121
122
123
124
125
126
127
128
129
130
131
132
133
134
135
136
137
138
139
140
141
142
143
144
145
146
147
148
149
150
151
152
153
154
155
156
157
158
159
160
161
162
163
164
165
166
167
168
169
170
171
172
173
174
175
176
177
178
179
180
181
182
183
184
185
186
187
188
189
190
191
192
193
194
195
196
197
198
199
200
201
202
203
204
205
206
207
208
209
210
211
212
213
214
215
216
217
218
219
220
221
222
223
224
225
226
227
228
229
230
231
232
233
234
235
236
237
238
239
240
241
242
243
244
245
246
247
248
249
250
251
252
253
254
255
256
257
258
259
260
261
262
263
264
265
266
267
268
269
270
271
272
273
|
#include <fstream>
#include <iostream>
#include <memory>
#include <vector>
#include <string>
#include <opencv2/opencv.hpp>
#include <NvInfer.h>
#include <cuda_runtime_api.h>
// CUDA 에러 체크 매크로 및 함수
#define CHECK_CUDA_ERROR(val) check((val), #val, __FILE__, __LINE__)
void check(cudaError_t err, const char* const func, const char* const file, const int line) {
if (err != cudaSuccess) {
std::cerr << "CUDA Runtime Error at: " << file << ":" << line << std::endl;
std::cerr << cudaGetErrorString(err) << " " << func << std::endl;
std::exit(EXIT_FAILURE);
}
}
// TensorRT 로그 출력을 위한 커스텀 Logger 클래스
class CustomLogger : public nvinfer1::ILogger {
void log(nvinfer1::ILogger::Severity severity, const char* msg) noexcept override {
// info 이하 레벨만 출력
if (severity <= nvinfer1::ILogger::Severity::kINFO) {
std::cout << msg << std::endl;
}
}
};
// TensorRT 객체 자동 삭제를 위한 Deleter 구조체
struct InferDeleter {
template <typename T>
void operator()(T* obj) const {
delete obj;
}
};
// Pascal VOC 21 클래스 색상 팔레트 (B,G,R 순서, OpenCV는 BGR)
cv::Vec3b getPascalVOCColor(int class_id) {
static const std::vector<cv::Vec3b> palette = {
{ 0, 0, 0}, // 0: background (black)
{128, 0, 0}, // 1: aeroplane
{ 0,128, 0}, // 2: bicycle
{128,128, 0}, // 3: bird
{ 0, 0,128}, // 4: boat
{128, 0,128}, // 5: bottle
{ 0,128,128}, // 6: bus
{128,128,128}, // 7: car
{ 64, 0, 0}, // 8: cat
{192, 0, 0}, // 9: chair
{ 64,128, 0}, // 10: cow
{192,128, 0}, // 11: diningtable
{ 64, 0,128}, // 12: dog
{192, 0,128}, // 13: horse
{ 64,128,128}, // 14: motorbike
{192,128,128}, // 15: person
{ 0, 64, 0}, // 16: potted plant
{128, 64, 0}, // 17: sheep
{ 0,192, 0}, // 18: sofa
{128,192, 0}, // 19: train
{ 0, 64,128} // 20: tv/monitor
};
if (class_id < 0 || class_id >= palette.size()) return {0,0,0};
return palette[class_id];
}
int main(int argc, char** argv) {
// 1. 입력 이미지 경로 및 엔진 파일 경로 지정
std::string image_path = "input.jpg"; // 입력 이미지 파일명
std::string engine_file_path = "end2end.engine"; // TensorRT 엔진 파일명
// 2. OpenCV로 이미지 읽기 (BGR)
cv::Mat img = cv::imread(image_path, cv::IMREAD_COLOR);
if (img.empty()) {
std::cerr << "이미지를 읽을 수 없습니다: " << image_path << std::endl;
return EXIT_FAILURE;
}
// RGB로 변환 (딥러닝 모델은 보통 RGB 입력)
cv::cvtColor(img, img, cv::COLOR_BGR2RGB);
// 3. TensorRT 엔진 역직렬화 및 실행 컨텍스트 생성
CustomLogger logger{};
std::ifstream engine_file(engine_file_path, std::ios::binary);
if (!engine_file) {
std::cerr << "엔진 파일을 열 수 없습니다: " << engine_file_path << std::endl;
return EXIT_FAILURE;
}
// TensorRT 모델을 메모리에 로드
engine_file.seekg(0, std::ios::end);
size_t engine_file_size = static_cast<size_t>(engine_file.tellg());
engine_file.seekg(0, std::ios::beg);
std::unique_ptr<char[]> engine_data(new char[engine_file_size]);
engine_file.read(engine_data.get(), engine_file_size);
std::unique_ptr<nvinfer1::IRuntime, InferDeleter> runtime{nvinfer1::createInferRuntime(logger)};
std::unique_ptr<nvinfer1::ICudaEngine, InferDeleter> engine{
runtime->deserializeCudaEngine(engine_data.get(), engine_file_size)};
std::unique_ptr<nvinfer1::IExecutionContext, InferDeleter> context{
engine->createExecutionContext()};
// 4. 입력/출력 텐서 이름, shape, dtype 확인
// (엔진에 따라 다를 수 있으니 반드시 확인 필요)
const char* input_tensor_name = engine->getIOTensorName(0); // 입력 텐서 이름
const char* output_tensor_name = engine->getIOTensorName(1); // 출력 텐서 이름
nvinfer1::Dims input_dims = engine->getTensorShape(input_tensor_name); // 예: {1, 3, H, W}
nvinfer1::Dims output_dims = engine->getTensorShape(output_tensor_name); // 예: {1, H, W}
int input_batch = input_dims.d[0];
int input_channels = input_dims.d[1];
int input_height = input_dims.d[2];
int input_width = input_dims.d[3];
int output_batch = output_dims.d[0];
int output_height = output_dims.d[1];
int output_width = output_dims.d[2];
// 5. 입력 이미지 전처리 (리사이즈, 정규화, NCHW 변환)
cv::Mat resized;
cv::resize(img, resized, cv::Size(input_width, input_height));
resized.convertTo(resized, CV_32FC3, 1.0 / 255.0); // 0~1 사이의 값으로 Normalization, AI모델이 학습 수행시 설정하였던 값으로 설정
// NCHW로 변환 (OpenCV는 HWC, TensorRT는 NCHW)
std::vector<float> input_tensor(input_channels * input_height * input_width);
std::vector<cv::Mat> rgb_channels(input_channels);
for (int i = 0; i < input_channels; ++i)
rgb_channels[i] = cv::Mat(input_height, input_width, CV_32FC1, input_tensor.data() + i * input_height * input_width);
cv::split(resized, rgb_channels);
// 6. 입력/출력 버퍼 할당 (CUDA)
void* input_device_buffer = nullptr;
size_t input_bytes = input_tensor.size() * sizeof(float);
CHECK_CUDA_ERROR(cudaMalloc(&input_device_buffer, input_bytes));
void* output_device_buffer = nullptr;
size_t output_bytes = output_height * output_width * sizeof(int64_t); // int64 클래스 ID
CHECK_CUDA_ERROR(cudaMalloc(&output_device_buffer, output_bytes));
// 7. TensorRT 실행 컨텍스트에 입력 버퍼 바인딩
context->setTensorAddress(input_tensor_name, input_device_buffer);
// 8. 실제 출력 텐서 shape와 타입 확인
nvinfer1::Dims output_dims = context->getTensorShape(output_tensor_name); // 실제 shape
size_t output_size = 1;
for (int i = 0; i < output_dims.nbDims; ++i) {
output_size *= output_dims.d[i];
}
nvinfer1::DataType output_dtype = engine->getTensorDataType(output_tensor_name);
// 9. 출력 버퍼 할당 및 추론 실행
void* output_device_buffer = nullptr;
size_t output_bytes = 0;
cudaStream_t stream;
CHECK_CUDA_ERROR(cudaStreamCreate(&stream));
// 10. 출력 타입에 따라 분기 처리
if (output_dtype == nvinfer1::DataType::kINT32) {
output_bytes = output_size * sizeof(int32_t);
CHECK_CUDA_ERROR(cudaMalloc(&output_device_buffer, output_bytes));
context->setTensorAddress(output_tensor_name, output_device_buffer);
// 추론 실행
bool status = context->enqueueV3(stream);
if (!status) {
std::cerr << "TensorRT 추론 실행에 실패했습니다." << std::endl;
return EXIT_FAILURE;
}
CHECK_CUDA_ERROR(cudaStreamSynchronize(stream));
// 결과 복사 및 마스킹
std::vector<int32_t> output_tensor(output_size);
CHECK_CUDA_ERROR(cudaMemcpy(output_tensor.data(), output_device_buffer, output_bytes, cudaMemcpyDeviceToHost));
// 마스크 생성
int mask_height = output_dims.d[output_dims.nbDims - 2];
int mask_width = output_dims.d[output_dims.nbDims - 1];
cv::Mat mask(mask_height, mask_width, CV_8UC3);
for (int y = 0; y < mask_height; ++y) {
for (int x = 0; x < mask_width; ++x) {
int class_id = static_cast<int>(output_tensor[y * mask_width + x]);
mask.at<cv::Vec3b>(y, x) = getPascalVOCColor(class_id);
}
}
cv::Mat mask_resized;
cv::resize(mask, mask_resized, img.size(), 0, 0, cv::INTER_NEAREST);
cv::Mat blended;
cv::addWeighted(img, 0.6, mask_resized, 0.4, 0, blended);
cv::cvtColor(blended, blended, cv::COLOR_RGB2BGR);
cv::imwrite("output_masked_voc.jpg", blended);
std::cout << "INT32 타입 결과를 output_masked_voc.jpg로 저장했습니다." << std::endl;
}
else if (output_dtype == nvinfer1::DataType::kINT64) {
output_bytes = output_size * sizeof(int64_t);
CHECK_CUDA_ERROR(cudaMalloc(&output_device_buffer, output_bytes));
context->setTensorAddress(output_tensor_name, output_device_buffer);
// 추론 실행
bool status = context->enqueueV3(stream);
if (!status) {
std::cerr << "TensorRT 추론 실행에 실패했습니다." << std::endl;
return EXIT_FAILURE;
}
CHECK_CUDA_ERROR(cudaStreamSynchronize(stream));
// 결과 복사 및 마스킹
std::vector<int64_t> output_tensor(output_size);
CHECK_CUDA_ERROR(cudaMemcpy(output_tensor.data(), output_device_buffer, output_bytes, cudaMemcpyDeviceToHost));
int mask_height = output_dims.d[output_dims.nbDims - 2];
int mask_width = output_dims.d[output_dims.nbDims - 1];
cv::Mat mask(mask_height, mask_width, CV_8UC3);
for (int y = 0; y < mask_height; ++y) {
for (int x = 0; x < mask_width; ++x) {
int class_id = static_cast<int>(output_tensor[y * mask_width + x]);
mask.at<cv::Vec3b>(y, x) = getPascalVOCColor(class_id);
}
}
cv::Mat mask_resized;
cv::resize(mask, mask_resized, img.size(), 0, 0, cv::INTER_NEAREST);
cv::Mat blended;
cv::addWeighted(img, 0.6, mask_resized, 0.4, 0, blended);
cv::cvtColor(blended, blended, cv::COLOR_RGB2BGR);
cv::imwrite("output_masked_voc.jpg", blended);
std::cout << "INT64 타입 결과를 output_masked_voc.jpg로 저장했습니다." << std::endl;
}
else if (output_dtype == nvinfer1::DataType::kFLOAT) {
output_bytes = output_size * sizeof(float);
CHECK_CUDA_ERROR(cudaMalloc(&output_device_buffer, output_bytes));
context->setTensorAddress(output_tensor_name, output_device_buffer);
// 추론 실행
bool status = context->enqueueV3(stream);
if (!status) {
std::cerr << "TensorRT 추론 실행에 실패했습니다." << std::endl;
return EXIT_FAILURE;
}
CHECK_CUDA_ERROR(cudaStreamSynchronize(stream));
// 결과 복사 및 마스킹
std::vector<float> output_tensor(output_size);
CHECK_CUDA_ERROR(cudaMemcpy(output_tensor.data(), output_device_buffer, output_bytes, cudaMemcpyDeviceToHost));
int mask_height = output_dims.d[output_dims.nbDims - 2];
int mask_width = output_dims.d[output_dims.nbDims - 1];
cv::Mat mask(mask_height, mask_width, CV_8UC3);
for (int y = 0; y < mask_height; ++y) {
for (int x = 0; x < mask_width; ++x) {
int class_id = static_cast<int>(output_tensor[y * mask_width + x]);
mask.at<cv::Vec3b>(y, x) = getPascalVOCColor(class_id);
}
}
cv::Mat mask_resized;
cv::resize(mask, mask_resized, img.size(), 0, 0, cv::INTER_NEAREST);
cv::Mat blended;
cv::addWeighted(img, 0.6, mask_resized, 0.4, 0, blended);
cv::cvtColor(blended, blended, cv::COLOR_RGB2BGR);
cv::imwrite("output_masked_voc.jpg", blended);
std::cout << "FLOAT 타입 결과를 output_masked_voc.jpg로 저장했습니다." << std::endl;
}
else {
std::cerr << "지원하지 않는 출력 데이터 타입입니다." << std::endl;
return EXIT_FAILURE;
}
// 11. 자원 해제
CHECK_CUDA_ERROR(cudaFree(input_device_buffer));
if (output_device_buffer) CHECK_CUDA_ERROR(cudaFree(output_device_buffer));
CHECK_CUDA_ERROR(cudaStreamDestroy(stream));
return 0;
}
|
cs |
참고자료: https://leimao.github.io/blog/TensorRT-Custom-Plugin-Example/
TensorRT Custom Plugin Example
TensorRT Custom Plugin Implementation and Integration
leimao.github.io
300x250
'프로그래밍 팁' 카테고리의 다른 글
| libtorch_cpu.so: undefined symbo: iJIT_NotifyEvent (0) | 2025.07.02 |
|---|---|
| git 사용시 오류 발생 해결 방법 - schannel: next InitializedSecurityContext failed (0) | 2025.03.17 |
| VirtualBox에 Ubuntu 24.04를 설치 후 해상도 확장하는 방법 (0) | 2025.01.02 |
| Ubuntu 24.04에서 apt 저장소를 mirror 사이트를 변경하는 방법 (0) | 2024.12.28 |
| MMCV 라이브러리로 Custom AI모델을 만들어보자!(1) - Backbone 추가하기 (2) | 2024.08.31 |
설정
트랙백
댓글
글
Windows 환경에서 Visual Studio Code로 Libtorch 라이브러리를 사용해 Torchscript 실행 프로그램 빌드 및 실행
프로그래밍 팁/Pytorch
2025. 8. 1. 00:24
Pytorch로 학습한 AI모델을 C++환경에서 구동하는 방법 중 하나인 Torchscript를 사용하기 위해 Libtorch를 다운로드한 후 Torchscript를 불러오는 간단한 예제를 만들어 테스트를 하려 했더나 아래와 같은 에러가 저를 반겼습니다...
Debug Assertion Failed!
File: minkernel\crts\ucrt\src\appcrt\stdio\fopen.cpp
line: 30
Expressing: file_name != nullptr
For information on how your program can cause an assertion failure, see the Visual C++ documentation on asserts.
(Press Retry to debug the application)

위 에러를 해결하기 위해 구글링 및 GPT를 사용해보았으나 마땅한 해답을 찾지 못하였습니다. 저와 같은 에러가 발생하였던 케이스들의 경우들도 오류의 원인 해결에 대한 언급이 없는 것으로 보았을 때 제 환경에서의 문제인 것으로 추정하였습니다.
테스트 수행을 위해 Libtorch 라이브러리 설치 단계부터 차근차근 다시 시도해보았습니다.
1. Pytorch 공식 페이지에서 Libtorch를 설치합니다. Release와 Debug 버전 두 가지 중 하나만 선택하여 다운로드합니다. 2개의 버전을 동시에 사용할 경우 문제가 복잡해질 가능성이 있습니다. 저의 경우 Pytorch 버전과 일치하는 Libtorch를 다운로드하였습니다. 공식 페이지에서는 최신 버전의 Libtorch만 제공되므로 혹시 이전 버전의 Libtorch를 찾고 싶으신 분은 아래의 페이지를 참조해주시기 바랍니다.
Libtorch 이전 버전을 다운로드 하는 방법
Pytorch로 AI모델 프로그래밍을 하다보면 버전 충돌 등으로 인해 과거의 Pytorch 버전을 설치해야 하는 상황에 직면하는 경우가 자주 있다보니 과거의 Pytorch 버전을 설치하곤 합니다. Pytorch 공식 홈
elecs.tistory.com
2. 다운로드한 Libtorch를 압축해제한 후 lib 폴더 경로를 아래와 같이 환경변수 'Path'에 등록합니다.

3. Visual Studio Code를 실행하여 C++ 개발 환경을 설정해줍니다. SHIFT + CTRL + P를 입력하여 명령팔레트에서 C/C++: 구성 편집을 찾아줍니다.

4. 위 과정에서 'c_cpp_properties.json' 파일이 생성됩니다. 아래와 같이 Libtorch에 있는 Library 파일 경로들을 추가해줍니다.
"includePath" [
"${workspaceFolder}/**,
"(Libtorch 설치 경로)/include",
"(Libtorch 설치 경로)/include/torch/csrc/api/include"
]

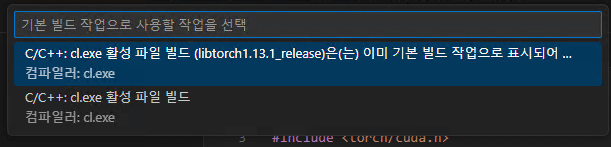
5. 이번에는 명령팔레트에서 작업:기본 빌드 작업 구성 → C/C++: cl.exe 활성 파일 빌드를 선택합니다.
6. 위 과정에서 'tasks.json' 파일이 생성된 것을 확인할 수 있습니다. 파일 내부에 아래와 같이 Libtorch 라이브러리를 설치해줍니다.
"args": [
....
"${file}",
"/I",
"(Libtorch 설치 경로)/include"
"/I",
"(Libtorch 설치 경로)/include/torch/csrc/api/include",
"/link",
"/LIBPATH:(Libtorch 설치 경로)/lib",
"c10.lib",
"torch.lib",
"torch_cpu.lib",
"torch_cuda.lib"
]
7. 이제 VSCode에 Libtorch 라이브러리 관련 설정이 모두 완료되었습니다. 아래의 예제 소스코드를 작성합니다.
test.cpp
|
1
2
3
4
5
6
7
8
9
10
11
12
13
14
15
16
17
18
19
20
21
22
23
24
|
#include <iostream>
#include <torch/script.h>
#include <torch/cuda.h>
using namespace std;
int main(){
torch::jit::script::Module module;
torch::Tensor tensor = torch::rand({1, 3});
cout << "Random Tensor: " << tensor << end;
cout << torch::cuda::is_available() << endl;
try {
torch::Device device(torch::kCUDA, 0); // GPU 사용
torch::Device device(torch::kCPU); // CPU 사용
string script = "end2end.pt";
module = torch::jit::load(script, device);
} catch (const c10::Error& e) {
cerr << "error loading the module \n";
return -1;
}
cout << "ok" << endl;
}
|
cs |
8. 입력한 소스코드를 'Ctrl + Shift + b" 버튼으로 Build를 수행합니다.
위 예제 소스코드 실행에 성공하셨다면 이제 본격적으로 Torchscript를 개발할 수 있는 환경이 갖추어진 것입니다.
300x250
'프로그래밍 팁 > Pytorch' 카테고리의 다른 글
| Libtorch 이전 버전을 다운로드 하는 방법 (0) | 2025.06.02 |
|---|---|
| Pytorch로 학습한 Image AI모델을 Torchscript로 변환 및 실행방법 (0) | 2025.02.20 |
